
Blog 2026
Moldy Weed: How to Spot It and Stay Safe
Nov
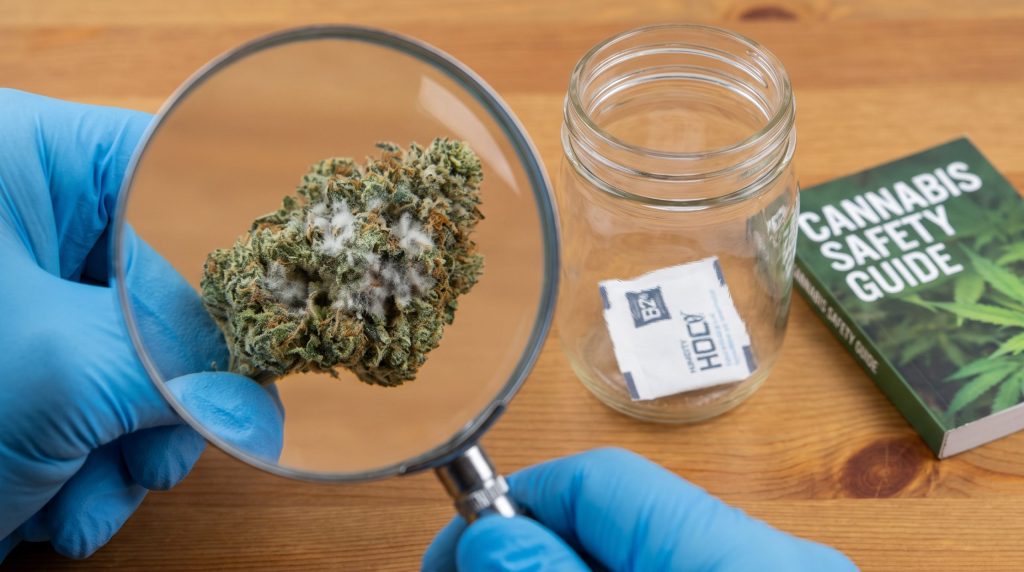
You open a jar, reach for a bud, and pause. Is that pale coating a frosty layer of trichomes, or something that belongs on forgotten leftovers? Distinguishing potent cannabis from moldy weed isn’t always easy, especially when the flower is dense, sticky, or naturally covered in white resin glands.
Here’s the rule that matters most: if you reasonably suspect mold, don’t smoke, vape, cook, or otherwise consume the cannabis. Mold can extend beneath the visible surface, and heating flower doesn’t reliably eliminate spores, fungal fragments, or heat-stable toxins. Losing part of a stash hurts, but gambling with your lungs is a lousy way to rescue C$40 worth of bud.
This guide explains how to inspect cannabis using sight, smell, texture, humidity, and magnification. You’ll learn how mold differs from trichomes and kief, why contamination develops, which symptoms warrant medical attention, and how to clean affected equipment. You’ll also find practical storage, drying, and curing guidelines for preventing the problem.
This is a safety-focused identification and storage review, not a diagnosis, laboratory test, or substitute for medical advice. You can spot warning signs at home, but only validated microbial testing can confirm what’s present. Regulations and disposal rules also vary by province, territory, and municipality, so check local cannabis and waste requirements when applicable.
One more thing before you start poking suspicious buds: minimize handling. Don’t bury your nose in the jar or tear the flower apart beside clean cannabis. Put the container down, move to a ventilated area, and inspect it without sending questionable dust around the room. Your stash may be replaceable: your respiratory system is annoyingly difficult to return under warranty.
Key Takeaways
- Always avoid smoking moldy weed, as mold spores and mycotoxins pose serious respiratory health risks.
- Inspect cannabis for mold using visual cues (fuzzy patches, discolouration), smell tests (musty or ammonia-like odours), and texture (overly damp or soft buds).
- Proper storage is crucial: keep weed in airtight glass jars at 58%–62% relative humidity, stored in cool, dark places to prevent mold growth.
- Do not attempt to salvage moldy weed by trimming or heating, as contamination often extends beyond visible areas and toxins may persist.
- If mold is detected, isolate and safely dispose of the cannabis according to local regulations, and thoroughly clean any containers or tools it contacted.
- Prevent mold by controlling moisture during drying and curing, maintaining cleanliness, ensuring airflow during cultivation, and regularly monitoring humidity levels with calibrated hygrometers.
Quick Answer: Should You Smoke Moldy Weed?
No, you shouldn’t smoke moldy weed. You also shouldn’t vape it, dab contaminated concentrate, bake it into edibles, or pick off the visible patch and use what remains.
Combustion may kill some living organisms, but that doesn’t make contaminated material safe. Cannabis smoke already contains particles and respiratory irritants: adding fungal spores, fragments, and possible mycotoxins creates unnecessary risk. Some contaminants or their byproducts can survive ordinary cooking or vaping temperatures, while inhalation delivers small particles directly into the lungs.
For many otherwise healthy adults, an accidental puff may result in nothing more than coughing, throat irritation, headache, or nausea. That’s not a guarantee. People with asthma, severe mold allergies, chronic lung disease, weakened immune systems, or pregnancy-related concerns may face greater risk and should be especially cautious.
If you discover suspicious flower:
- Stop using it immediately. Don’t take another hit to “confirm” the taste.
- Close and isolate the container from clean cannabis.
- Photograph the product and label if it came from a retailer.
- Contact the seller about its return, recall, or complaint process.
- Dispose of it safely if a return isn’t possible.
- Clean anything it touched, including jars, trays, and grinders.
The retailer may request the package, lot number, purchase date, and photographs. Keep those details, but don’t reopen the container repeatedly. If several products from one batch appear affected, report that pattern to Health Canada or your provincial or territorial cannabis regulator.
Bottom line: When you’re deciding whether suspicious cannabis is mold or resin, uncertainty itself is a reason not to inhale it. No home remedy can certify contaminated flower as safe.
How to Tell If You Have Moldy Weed (Visual, Smell, and Texture Checks)
No single home check proves that cannabis is mold-free. Your best screening method combines several clues: appearance, odour, feel, internal condition, and storage humidity. Inspect suspicious material under bright light and away from clean flower. If disturbing it releases dust or causes respiratory symptoms, stop.
What moldy weed looks like (webbing, fuzzy growth, white/grey spots vs trichomes)
Mold often looks irregular rather than evenly frosted. Watch for:
- Cottony white, grey, tan, or green growth
- Fine web-like strands crossing leaves or flower crevices
- Patchy powder that seems to sit on top of the plant tissue
- Dark specks or discoloured areas surrounded by soft material
- Grey fuzz deep inside a dense bud
- Brown, dead-looking flower that separates unusually easily
Trichomes, by contrast, resemble tiny translucent or amber mushrooms under magnification. They reflect light and are distributed according to the flower’s anatomy. Mold tends to form mats, threads, blotches, or dusty colonies.
Colour alone can mislead you. Purple genetics, orange pistils, pale leaf tips, and tan plant fibres may all be normal. Turn the bud under a flashlight. Resin sparkles as the angle changes: fuzzy growth generally remains dull and fibrous.
Smell test: musty, basement, ammonia, sour notes
Healthy flower may smell skunky, fruity, piney, peppery, gassy, earthy, or downright strange. Those aromas arise largely from terpenes and other volatile compounds. Mold-associated odours feel different: think wet cardboard, a damp basement, mildew, old towels, or soil left in a closed bag.
An ammonia-like odour is another warning. It can develop when overly wet plant material sits in a low-oxygen container and begins degrading. Sharp sourness, fermented grass, or an odour resembling compost also deserves caution.
Don’t press your face into the jar and inhale deeply. Instead, open it at arm’s length in a ventilated space and notice whether an abnormal odour escapes. If you have asthma or a significant mold allergy, skip this test and ask a knowledgeable, healthy adult to help, or discard the product.
Odour isn’t definitive. Some contaminated cannabis has little obvious smell, while unfamiliar cultivars can have naturally funky profiles. Treat the smell test as one piece of evidence, not permission to override visible warning signs.
Touch/feel: overly soft, damp, spongy buds: abnormal stickiness
Properly cured flower usually feels slightly springy and resinous without seeming wet. Small stems may snap, while larger stems can retain some flexibility. The bud should hold its structure rather than compress like a damp sponge.
Questionable signs include:
- A cold, clammy, or wet surface
- A bud that stays flattened after gentle pressure
- Soft inner flower beneath a dry exterior
- Sliminess or a paste-like residue
- Material that smears rather than breaking apart
- Unexplained stickiness paired with sour or musty odour
Resinous cannabis can be extremely sticky, so tackiness alone doesn’t equal contamination. The distinction is texture plus context. Healthy resin pulls at your fingers like tree sap: wet deterioration feels damp, slippery, or mushy.
Wear disposable gloves if contamination appears extensive. Don’t squeeze every nug in the batch, because handling can distribute spores. Inspect one representative bud and, if needed, one from the opposite side of the container. Finding mold on either is enough reason to quarantine the entire lot.
Taste and smoke cues (harshness, chemical/earthy off-flavours, crackling from moisture)
Taste should never be your primary mold test. If the flower already looks or smells suspicious, don’t light it merely to solve the mystery.
Sometimes contamination becomes apparent only after use. Warning signs may include unusually harsh smoke, immediate throat burning, persistent coughing, a stale basement flavour, or chemical, sour, and rotten-earth notes that don’t match the cultivar. Excessive crackling or sizzling may indicate retained moisture, though seeds, stems, or uneven burning can also cause noise.
Stop if the experience is dramatically different from previous flower in the same package. Set the material aside, rinse your mouth, get fresh air, and monitor how you feel. Avoid taking more cannabis to counter anxiety or discomfort: that can make it harder to interpret symptoms.
Harsh smoke isn’t proof of mold. Poor flushing, old flower, pesticides, excessive heat during drying, and ordinary combustion can all produce unpleasant smoke. Conversely, contaminated flower may not taste obviously wrong. Sensory cues can warn you, but they can’t establish safety.
At-home confirmation: jar humidity check (RH range), flashlight/magnifier inspection
A small calibrated digital hygrometer can reveal whether stored flower is sitting in a risky environment. Place it in the closed jar without adding a humidity pack and allow the reading to stabilize for several hours. For cured flower, roughly 58% to 62% relative humidity (RH) is a commonly used storage target. Persistent readings above about 65% call for concern and immediate inspection: around 70% RH or higher creates a substantially more favourable environment for microbial growth.
A reading is not a mold test. RH can vary within dense buds, and inexpensive hygrometers may be several percentage points off. Calibrate the device using its manufacturer’s instructions or a commercial calibration kit.
For visual inspection, use a bright white flashlight and a 30x–60x jeweller’s loupe or inexpensive USB microscope. Examine crevices, broken interior surfaces, and the area near stems. Trichome heads should appear discrete and glassy. Branching threads, flattened fuzzy mats, or clustered dusty growth are suspicious.
Don’t rely on UV lights, phone apps, or online photographs for confirmation. If the distinction remains unclear, a regulated cannabis testing laboratory is the only meaningful next step, and for a small personal quantity, disposal is usually more practical.
Mold vs Trichomes vs Powdery Kief: Common Confusions
Cannabis is naturally covered in structures that can resemble contamination. The challenge is identifying how the material sits on the flower, not merely whether it appears white. Use magnification whenever possible.
| Feature | Trichomes or kief | Mold or mildew |
|---|---|---|
| Pattern | Fairly consistent with plant surfaces | Irregular patches or hidden colonies |
| Light response | Sparkles or glitters | Often dull, dusty, or fuzzy |
| Magnified shape | Stalks with rounded gland heads | Threads, mats, or powdery growth |
| Odour | Cultivar-typical aroma | Musty, damp, sour, or ammonia-like |
| Effect on tissue | Flower remains structurally sound | Tissue may soften, brown, or collapse |
Trichomes: sparkle, uniform coverage, not fuzzy/patchy
Trichomes are resin-producing glands concentrated on cannabis flowers and nearby sugar leaves. Under a loupe, many look like tiny clear, cloudy, or amber lollipops: a narrow stalk supporting a rounded head. Their density can vary, but their shapes remain relatively distinct.
Move the bud beneath a flashlight. Trichomes catch the light in pinpoints, giving the flower its familiar “frosted” appearance. They don’t form cobwebs across open gaps, and they shouldn’t resemble cotton fibres.
Loose trichome heads and fragments collect as kief. Kief usually looks sandy, pale green, gold, or tan and gathers at the bottom of a grinder. It feels granular or powdery rather than fluffy. But, kief can itself become contaminated if damp flower enters the grinder, so familiar appearance isn’t an absolute safety guarantee.
A useful comparison is frost versus lint: frost crystals repeat across a surface and shine: lint clumps unpredictably and has visible fibres. If you see both legitimate trichomes and a strange fuzzy patch, don’t assume the resin cancels out the mold. It doesn’t.
Powdery mildew on cannabis: where it appears and how it differs on dried flower
Powdery mildew commonly begins on living plants as circular, flour-like patches on leaf surfaces. As it spreads, leaves and flowers may appear dusted with white or grey powder. Unlike trichomes, the coating looks flat and opaque rather than crystalline.
On dried flower, recognition becomes harder. Handling and trimming may remove obvious leaf patches, while infection can remain in crevices or around sugar leaves. A pale film that appears painted onto the plant, especially when paired with distorted or discoloured tissue, is suspicious.
Never blow on a suspected patch. That charming little experiment can aerosolize particles and contaminate nearby surfaces. Likewise, don’t scrape it to see whether it returns: once dried flower is visibly affected, the goal is containment rather than horticultural diagnosis.
Powdery mildew encompasses multiple fungi, and not every species behaves identically. Still, you don’t need to identify a species before rejecting contaminated flower. If a white coating lacks distinct trichome structures and appears patchy, dusty, or matte, quarantine it.
Bud rot indicators: browning inside the nug and easy crumble
Bud rot, commonly associated with Botrytis cinerea, often starts inside dense flowers where moisture lingers. The exterior can look acceptable while the centre is brown, grey, or dead. That’s why gently opening one unusually soft or discoloured bud can reveal more than staring at its surface.
Typical signs include:
- Brown or grey tissue surrounding the inner stem
- Sugar leaves that pull out with almost no resistance
- A dry, decayed centre even though a moist exterior
- Grey fuzz or wispy filaments between flower clusters
- A puff of dust when the nug is disturbed
- Unexplained sections that crumble into dull, lifeless material
Normal cured cannabis can crumble when it’s overdried, but it should retain recognizable plant structure and resin. Rotting tissue seems to collapse from within.
If one flower shows internal rot, assume neighbouring buds were exposed. Don’t salvage the attractive exterior or feed contaminated plant material into an extraction process. Seal the batch, examine separately stored containers, and clean the inspection area.
Why Weed Gets Moldy: The Real Causes
Mold requires favourable conditions, not moral failure or bad luck. Spores are widespread in normal environments: problems arise when moisture, temperature, plant material, and time align. Understanding that chain helps you prevent a repeat.
Too much moisture: improper drying/curing and sealing too early
Freshly harvested cannabis contains considerable water. Drying must remove enough moisture from stems and flowers before the material enters sealed curing containers. If the outside dries quickly while dense interiors remain wet, a condition growers sometimes call case hardening, the flower may seem ready even though moisture will redistribute after sealing.
That redistribution is why a jar can read safely at first and climb hours later. If the stabilized RH remains above 65%, the cannabis needs attention: if you find mustiness, soft spots, or visible growth, it needs disposal rather than additional drying.
Sealing wet flower early creates a miniature greenhouse. Water activity and RH aren’t identical measurements, but elevated moisture makes fungal growth more likely. Oversized buds are particularly vulnerable because their centres dry slowly.
Humidity packs don’t fix improperly dried cannabis. They’re designed to buffer modest changes during storage, not absorb a harvest’s excess water. Dropping a 62% Integra Boost or Boveda pack into a jar of wet flower is like putting a coaster under a leaking sink, tidier, perhaps, but not a repair.
Storage mistakes: warm temps, light exposure, poor airflow, dirty containers
Warmth accelerates many biological and chemical processes, while sunlight and heat degrade cannabinoids and aroma compounds. A jar on a windowsill, beside an oven, or in a hot car experiences temperature swings that can move moisture around and create condensation.
Airtight storage is beneficial only after flower is properly dried. During early curing, containers need scheduled gas and moisture exchange. Later, repeated opening in a humid room can introduce moisture and contaminants.
Dirty containers add another avoidable risk. Reusing a jar with old crumbs, residue, or an unknown odour can inoculate a fresh batch. Decorative wooden boxes and unglazed ceramic containers may also absorb moisture and are difficult to sanitize.
Poor airflow matters most during cultivation and drying. Flowers packed tightly on racks or hung against walls develop stagnant pockets. Once cured cannabis is safely sealed, you don’t need airflow through the jar: you need stable temperature and humidity. The distinction trips up beginners because “airtight” and “ventilated” are correct at different stages.
Contamination sources: spores, handling, shared grinders, humid rooms
Spores can arrive on plants, clothing, hands, pets, ventilation systems, packaging, and tools. Outdoor cultivation faces natural exposure, but indoor rooms aren’t sterile bubbles. A dirty pre-roll station or damp basement can create trouble just as effectively as rainy weather.
Shared grinders deserve special attention. If questionable flower goes through a grinder, particles can lodge around the teeth, screen, threads, and kief chamber. Adding clean cannabis afterward may spread contamination. The same applies to rolling trays, trimming scissors, scales, and storage bags.
Handling buds with wet hands or after applying lotion introduces moisture and residue. Breathing directly into a jar, licking a rolling paper over an open grinder, or storing cannabis in a steamy bathroom also raises preventable risks. Yes, bathrooms are convenient hiding places. No, they aren’t tiny climate-controlled dispensaries.
The solution isn’t obsessive sterility. Use clean, dry tools: wash and thoroughly dry your hands: keep cannabis away from humid rooms: and avoid combining batches. Separate storage makes it easier to trace a problem without sacrificing everything.
Types of Mold and Fungus Found on Cannabis (And Why It Matters)
You usually can’t identify a fungal species by sight. Laboratory methods such as culture, microscopy, and molecular testing are needed, and testing rules vary among jurisdictions. Still, understanding the broad categories explains why appearance alone can underestimate risk.
Botrytis (bud rot/grey mold)
Botrytis cinerea causes the condition growers call grey mold or bud rot. It thrives when susceptible plant tissue remains damp and airflow is limited. Dense flowers may rot internally before an obvious grey colony reaches the surface.
During cultivation, an affected sugar leaf may yellow or wilt while surrounding tissue still looks healthy. When gently pulled, that leaf can detach because its base has decayed. Later, flower tissue turns tan or brown, becomes soft, and develops grey fuzzy growth. Under drier conditions, the damaged centre may instead appear brittle.
Botrytis spreads readily through spores and contaminated plant debris. Growers should remove affected plants or branches according to a careful containment plan rather than carrying open, infected flowers through the room. Consumers who encounter suspected bud rot in finished cannabis should isolate the entire package.
The fungus’s presence also signals that handling or environmental controls failed somewhere. Even if you could remove every visible strand, which you can’t verify, the degraded flower and invisible contamination remain. Bud rot isn’t an extra-aged cure: it’s decomposition.
Powdery mildew
Powdery mildew is a collective name for fungal diseases that create pale, powder-like growth, often on leaves and flowers. Cannabis-associated species can develop even without water droplets sitting on a leaf, although humidity and crowded, poorly ventilated canopies generally increase disease pressure.
Early infections may resemble a light dusting of flour. Patches expand, merge, and interfere with plant health. In a grow room, management can involve environmental correction, sanitation, pruning strategy, and crop-safe treatments applied according to law and label directions. Applying random kitchen remedies to mature flowers can add residues without solving the underlying infection.
Finished flower with suspected powdery mildew should not be consumed. Washing harvested buds may remove some surface material but cannot validate the interior or guarantee that all fungal components are gone. Processing the flower into oil similarly concentrates uncertainty unless a regulated remediation and testing system demonstrates compliance.
For consumers, species identification changes little: powdery material that isn’t made of distinct resin glands is a rejection signal.
Aspergillus, Penicillium, and other storage molds
Species within Aspergillus and Penicillium are common environmental and storage molds. Some can trigger allergies or respiratory illness: certain strains may produce mycotoxins under suitable conditions. Not every species produces toxins, and toxin production depends on environmental factors, so visual appearance can’t tell you the chemical risk.
Aspergillus deserves particular caution for immunocompromised people because inhaled spores can, in rare circumstances, cause serious infection. Several legal cannabis markets hence require microbial screening for selected Aspergillus species or total yeast and mold, although standards and methods differ.
Other fungi and yeasts may colonize poorly dried plant material. A laboratory “total yeast and mold” result measures a broader microbial load, while targeted molecular tests look for particular organisms. Neither concept translates neatly into a kitchen-table inspection.
That uncertainty is precisely why home remediation is a bad wager. You can’t see individual spores, confirm toxin absence, or determine viability by smell. When storage mold appears, treat the entire exposed batch as compromised.
What Happens If You Smoke Moldy Weed? Risks, Symptoms, and Who’s Most Vulnerable
Responses vary with the contaminant, exposure level, consumption method, and your health. Most accidental exposures don’t automatically become medical emergencies, but some symptoms require prompt attention. Stay observant without spiralling into internet-diagnosis mode.
Short-term effects: throat/lung irritation, coughing, headaches, nausea
Possible immediate effects include throat burning, coughing, wheezing, chest irritation, headache, dizziness, nausea, nasal congestion, and irritated eyes. Cannabis smoke itself can produce several of these symptoms, making the cause difficult to separate.
If you suspect exposure, stop consuming the product and move to fresh air. Drink water if you can swallow normally, but don’t force vomiting or use unproven “detox” products. Save the packaging and lot information in case a clinician, retailer, or regulator needs it.
Monitor when symptoms began, whether they’re improving, and whether breathing feels different from your usual cannabis response. A brief cough that resolves is not the same as worsening shortness of breath over several hours.
Cannabis can also heighten awareness and anxiety. Slow your breathing, sit somewhere safe, and have a trusted person stay with you if you feel panicked. But don’t dismiss objective symptoms, especially wheezing, facial swelling, fainting, or blue lips, as “just being too high.”
Allergic reactions vs infection: warning signs to take seriously
An allergic response can begin quickly after exposure. Signs may include sneezing, itchy or watery eyes, hives, nasal congestion, wheezing, or swelling. Severe reactions involving difficulty breathing, throat tightness, widespread hives, faintness, or facial and tongue swelling require emergency care.
A fungal infection is different. It may develop over time and is much less common in healthy people, but risk rises substantially with immune suppression. Persistent fever, worsening cough, chest pain, unusual fatigue, shortness of breath, or coughing blood should be assessed by a medical professional.
You can’t reliably distinguish allergy, irritation, asthma, infection, and cannabis-related anxiety at home. Tell the clinician exactly what you inhaled, when you used it, whether mold was visible, and what medical conditions or medications you have. That information is clinically useful, not an invitation for judgment.
If symptoms are mild but lingering, contact your healthcare provider or a poison centre for individualized guidance. In Canada, you can reach your local poison centre at 1-844-POISON-X (1-844-764-7669) (in Quebec, 1-800-463-5060).
Higher-risk groups: asthma, mold allergies, immunocompromised, pregnancy
People with asthma or chronic lung conditions may react more strongly to smoke and fungal particles. Someone with a known mold allergy may develop symptoms at an exposure level that causes little reaction in another person.
Immunocompromised people face the most concerning infection risk. This group can include organ- or stem-cell-transplant recipients, people receiving chemotherapy, individuals taking high-dose corticosteroids or certain immune-modulating medicines, and those with advanced immune disorders. Risk differs by condition, so personalized medical advice matters.
During pregnancy, avoiding contaminated cannabis is only one part of the picture. Major health organizations, including Health Canada, advise against cannabis use during pregnancy because potential fetal and maternal risks aren’t limited to mold. Discuss nausea, pain, sleep problems, or cannabis dependence with a prenatal clinician rather than switching consumption methods on your own.
Older adults, very young children exposed accidentally, and anyone with significant respiratory disease also deserve a lower threshold for seeking guidance. If you belong to a higher-risk group and knowingly inhaled moldy material, contact your clinician even if symptoms initially seem modest.
When to seek medical care (red-flag symptoms)
Call 911 or your local emergency number immediately for:
- Severe difficulty breathing or rapidly worsening shortness of breath
- Blue or grey lips, confusion, collapse, or inability to stay awake
- Swelling of the lips, tongue, face, or throat
- Chest pain, especially with sweating, weakness, or breathing difficulty
- Coughing blood
- Signs of anaphylaxis, such as breathing trouble plus hives or faintness
Seek prompt clinical advice for persistent wheezing, fever, a worsening cough, repeated vomiting, significant chest tightness, or symptoms lasting longer than expected. Higher-risk patients shouldn’t wait for dramatic symptoms.
If someone has an epinephrine auto-injector for known severe allergies and develops symptoms covered by their action plan, use it as prescribed and call emergency services. Don’t drive while intoxicated, dizzy, or short of breath.
Bring or photograph the product label, but don’t carry an open moldy jar into a clinic. Seal it first. Mention other substances consumed, including nicotine, alcohol, concentrates, or medications: interactions and dose can affect the assessment.
Can You Remove Mold From Weed and Still Use It?
No reliable home method turns moldy cannabis into safe cannabis. Advice about washing, trimming, heating, or extracting tends to focus on visible growth while ignoring microscopic contamination and toxins.
Why brushing, rinsing, baking, microwaving, or “cutting off” moldy parts doesn’t make it safe
Cannabis flower is porous and intricately folded. Fungal structures can extend beneath the visible colony, while spores move among neighbouring buds. Cutting a generous border around a patch works poorly because there’s no reliable boundary you can see.
Brushing or blowing redistributes particles. Rinsing can leave additional moisture and doesn’t prove removal. Baking and microwaving heat unevenly, may scorch cannabinoids and terpenes, and cannot guarantee destruction of every hazardous byproduct. Alcohol extraction can carry unwanted compounds into a concentrate rather than magically selecting only THC.
Commercial remediation technologies, such as controlled irradiation or decontamination systems, operate under validated procedures and should be followed by appropriate testing. They aren’t comparable to putting a nug in a kitchen oven. Even regulated remediation may reduce viable microbes without reversing degraded plant tissue or proving that every possible toxin is absent.
Avoid giving suspect cannabis to someone who “doesn’t mind,” using it for homemade topicals, or composting it beside cannabis plants. Disposal is the only practical household response that doesn’t pass the risk elsewhere.
Mycotoxins and spores: what you can’t see
A spore is microscopic reproductive material: a mycotoxin is a chemical produced by certain fungi under particular conditions. They’re not the same thing, and killing a living fungus doesn’t necessarily remove compounds it already produced.
Not every moldy bud contains a meaningful concentration of mycotoxins. The problem is that you can’t establish absence with your eyes, nose, or lighter. Some toxins are comparatively heat-stable, and ordinary cooking temperatures aren’t a dependable safeguard.
Visible mold may also represent only one colony within a larger contaminated lot. Air movement, grinding, and handling can spread spores well beyond the obvious patch. Once flower has been ground together, separating clean particles becomes impossible.
This is where the sunk-cost trap hits: the more expensive the cannabis, the harder it feels to throw away. But price, rarity, and sentimental attachment don’t change microbiology. Photograph premium or medical products, document the lot number, and pursue a refund through the seller. Don’t convert a quality-control complaint into a respiratory experiment.
What to Do With Moldy Weed: Safe Next Steps (Disposal, Cleaning, and Containment)
Your priorities are simple: stop exposure, prevent spread, preserve evidence if needed, and clean contacted surfaces. Handle the smallest amount possible.
How to isolate the stash to prevent cross-contamination
Close the original container gently. Place it inside a sealable plastic bag or second rigid container, label it “DO NOT USE,” and move it away from other cannabis, food, children, and pets. Avoid squeezing air out of the bag, which can push particles through gaps.
Don’t open every adjacent jar in the same room. First wash your hands, clean the surface, and inspect other batches one at a time. Containers stored together aren’t automatically contaminated, but shared tools and mixed flower increase the likelihood.
If the product came from a retailer, keep the label, receipt, lot or batch number, and photographs. Check the retailer’s website and Health Canada’s list of cannabis recalls. Contact the store before travelling: it may have specific instructions for returns involving contamination.
Wash clothing if you handled a heavily affected harvest, and shower before entering a clean grow space. For a single consumer jar, you generally don’t need to treat your home like a hazardous-material scene. Calm containment beats shaking the bud under three lamps for “one last look.”
How to dispose of moldy cannabis responsibly (local rules, sealed bag method)
Disposal laws differ, particularly for regulated medical or adult-use cannabis. Follow local rules and any instructions from the retailer or regulator. Don’t flush cannabis down the toilet: it can enter wastewater systems and doesn’t prevent diversion.
Where household disposal is permitted, make the flower unusable by mixing it with an undesirable material such as used coffee grounds, dirt, or cat litter. Place the mixture in a sealed bag or leak-resistant container, then put it in secured household trash inaccessible to children, pets, and wildlife. Remove or obscure personal information from prescription-style labels.
Don’t burn a pile of contaminated flower. That creates smoke exposure and may violate local fire or cannabis laws. Avoid backyard compost if you grow cannabis or other susceptible plants, since composting conditions may not reliably destroy all spores.
For larger cultivation quantities, commercial waste rules may apply. Licensed operators should follow inventory tracking, quarantine, destruction, and documentation requirements rather than using household disposal methods.
How to clean jars, grinders, and tools after mold exposure
Wear gloves, work in a ventilated area, and keep cleaning materials away from children and flames. First remove visible plant debris without brushing it into the air. Disposable paper towels are preferable to a kitchen sponge you plan to keep.
Glass jars and nonporous metal tools can generally be washed with hot water and dish detergent, rinsed, and thoroughly dried. A dishwasher may be appropriate for heat-safe glass. After washing, sanitize using a product labelled for the surface and follow its required concentration and contact time. Never mix bleach with ammonia, vinegar, alcohol, or other cleaners.
Disassemble grinders if the manufacturer allows it. Clean threads, teeth, screens, and collection chambers: discard the kief. Isopropyl alcohol is commonly used on compatible metal or glass, but it can damage acrylic, paint, rubber, and some finishes. Keep it away from ignition sources and let every component dry completely.
Discard porous wooden containers, cardboard packaging, or fabric pouches that retain odour or visible growth. Once everything is dry, store cleaned equipment separately from any uninspected cannabis.
How to Prevent Moldy Weed (Storage, Drying, and Curing Best Practices)
Prevention comes down to moisture control, cleanliness, and routine inspection. You don’t need a laboratory-grade vault: you need stable conditions and a few sensible habits.
Storage setup: airtight glass, cool/dark location, avoid fridge/freezer moisture swings
Use clean, dry, airtight glass jars sized to the amount of flower. Too much empty space can accelerate aroma loss through repeated air exchange, while overpacking compresses buds and makes inspection difficult. Leave enough room to move the flower gently during early curing.
Store jars in a cool, dark cabinet away from ovens, radiators, windows, showers, and exterior walls prone to condensation. A stable room around 15–21°C (60–70°F) is preferable to a location that repeatedly becomes hot, although exact conditions depend on your home.
Refrigerators and freezers introduce complications. Temperature changes during removal can cause condensation, household refrigerators fluctuate in humidity, and frozen trichomes become brittle. Long-term commercial preservation can use controlled cold storage, but casually moving a jar between the freezer and countertop invites moisture swings.
Opaque containers such as Herb Guard jars can block light, but ordinary Mason jars kept inside a dark cabinet work well. Silicone stash pouches are convenient for short trips: glass is easier to inspect and clean for longer storage. Label each jar with cultivar, source, and storage date rather than combining leftovers into one mystery blend.
Humidity targets and tools: hygrometers, humidity packs, ideal RH range
For cured flower, target approximately 58%–62% RH inside the sealed container. Some users prefer 58% for a slightly drier texture and others choose 62% for a softer feel. Either is far safer than allowing moisture to climb unchecked.
Small digital hygrometers cost roughly US$8–$20, though accuracy varies. Calibrate them periodically and compare suspect units side by side. A reading that remains above 65% warrants investigation: remove the flower from long-term sealed storage and check for odour, soft centres, or visible growth. If any mold sign appears, discard it.
Two-way humidity packs from brands such as Boveda and Integra Boost can buffer modest fluctuations. Choose a size appropriate for the amount of cannabis and replace hardened or exhausted packs according to the manufacturer’s instructions. Don’t use orange peel, bread, lettuce, or damp paper towel to rehydrate cannabis. Those folk tricks add uncontrolled moisture and nutrients, essentially setting a tiny buffet for microbes.
Remember that humidity packs maintain properly cured flower: they don’t complete drying. Measure first, then use the pack as a stabilizer rather than a rescue device.
Curing correctly: burping schedule, spotting early warning signs
Curing begins only after an even, controlled dry. A common starting approach is to fill clean jars roughly three-quarters full and monitor RH over the first day. If it rises rapidly beyond the safe range, the flower wasn’t ready for sealed curing.
During the first week or two, open jars briefly once or twice daily to exchange air and release excess moisture, adjusting based on hygrometer readings and flower condition. As readings stabilize, reduce openings to every few days, then store sealed. There’s no magic universal calendar: bud density, ambient humidity, jar size, and drying method all matter.
At every opening, check for:
- Condensation on glass
- Clumping or buds sticking together
- A shift toward ammonia, sour grass, or mustiness
- Soft or dark interiors
- RH that rebounds above 65%
If flower is merely a little too moist and shows no contamination signs, spread it in a clean, dark, climate-controlled space for a short period before rechecking. If odour or growth suggests mold, extra drying won’t restore safety.
Keep batches separate. One wet harvest shouldn’t become everybody’s problem.
Preventing mold during grow/dry: airflow, spacing, sanitation, filtration overview
During cultivation, control humidity according to the plant’s growth stage and local conditions. Dense flowering canopies generally need lower humidity than young vegetative plants because compact buds trap moisture. Use calibrated environmental sensors at canopy height rather than relying solely on a controller mounted across the room.
Provide gentle circulation above and below the canopy without blasting one plant continuously. Exhaust systems should exchange humid air, and dehumidifiers must be sized for the room and watered biomass. Space and prune plants so leaves aren’t packed into stagnant walls of green.
Sanitation matters between cycles: remove dead plant material, clean tools, address standing water, and replace or service filtration according to manufacturer guidance. Don’t work from an infected room into a clean room wearing the same gloves and clothes.
During drying, hang branches with space between them in darkness and maintain controlled temperature, humidity, and airflow. Fans should circulate room air rather than point directly at flowers, which can dry exteriors too quickly. Inspect dense colas daily, especially after rainy outdoor harvests.
For licensed facilities, documented environmental monitoring, validated sanitation procedures, HVAC maintenance, and compliant microbial testing are essential. Home growers can borrow the principle even without industrial gear: measure, record, inspect, and correct small problems before they become fuzzy ones.
FAQs About Moldy Weed
These answers address the questions that tend to appear after someone has already stared at a bud for 20 minutes and compared it with increasingly alarming internet photos.
Is moldy weed always visible?
No. Mold may begin inside a dense flower, and spores are microscopic. A bud can look normal externally while hiding brown tissue, grey growth, or excess moisture around its inner stem. Some contamination also produces little obvious odour.
That doesn’t mean every normal-looking bud is secretly dangerous. It means visual inspection has limits. Buy cannabis from reputable sources, check recall notices, keep products in their original labelled packages, and use stable storage conditions.
Open unusually soft or discoloured buds under good lighting before grinding them. A loupe helps distinguish resin glands from thread-like growth. Monitor jar RH and pay attention to abrupt changes in aroma or texture.
Laboratory testing provides stronger evidence than sensory screening, but even test results represent a particular sample and point in time. Improper storage after purchase can still create problems. If a product has spent days in a hot, humid car or shows condensation, don’t let an earlier test label overrule what’s now in front of you.
Does vaping or making edibles kill mold?
Neither method reliably makes contaminated cannabis safe. A vaporizer heats flower without full combustion, but temperatures and exposure times vary across the chamber. Even if heat kills some viable fungal cells, it may not remove spores, fragments, or previously produced toxins.
Edible preparation has the same limitation. Decarboxylation and baking aren’t validated decontamination processes, and many mycotoxins can tolerate temperatures used in ordinary cooking. Infusing cannabis into butter or oil may transfer unwanted compounds into the final product.
Water pipes don’t solve it either. Water can trap some particles, but it doesn’t sterilize smoke. Concentrate extraction and homemade rosin pressing similarly offer no household guarantee of safety.
The practical answer is frustratingly boring: discard moldy flower. If you need cannabis for symptom management and losing the batch creates a care gap, contact your clinician or dispensary about a safe replacement rather than improvising remediation.
What humidity level causes weed to mold in a jar?
There isn’t one instant-trigger number. Mold risk depends on humidity, temperature, time, contamination level, flower density, and how evenly the cannabis was dried. Still, sustained jar RH above roughly 65% should prompt action, and readings near or above 70% create a much more favourable environment for growth.
Aim for 58%–62% RH after curing. Let a hygrometer stabilize in the sealed jar, account for its accuracy, and check multiple times during early curing. A brief spike after opening the jar in humid air differs from a reading that stays high overnight.
If RH is elevated but the flower has no musty odour, discolouration, soft interior, or visible growth, correct the drying process promptly and reassess. Once contamination is suspected, lowering humidity merely slows additional growth: it doesn’t erase what already developed.
The final call on moldy weed is simple: when appearance, smell, texture, or storage history raises credible doubt, don’t consume it. Isolate the batch, document a retail product, clean exposed equipment, and dispose of it according to local rules. Then reset your storage with dry glass, a calibrated hygrometer, and stable 58%–62% RH.
Throwing away cannabis can feel wasteful, particularly when money is tight or the flower is hard to replace. But salvaging a questionable nug isn’t thrift, it’s accepting a health risk you can’t measure. Protect your lungs, learn from the storage failure, and make the next jar boringly uneventful. In this case, boring is exactly what you want.