
Blog 2026
How to Clean a Weed Grinder: 4 Safe Methods
Nov
A grinder that squeaks, sticks, or refuses to turn isn’t necessarily broken. Usually, a thin layer of compressed plant material and resin has glued the teeth, threads, or screen together. Keep forcing it and you can damage the coating, warp the lid, or send precious kief flying across the counter, I’ve learned that last lesson the messy way.
Learning how to clean a weed grinder restores a smooth grind, reduces cross-contamination between strains, and helps the screen collect fine trichomes instead of holding stale debris. The right technique depends on what your grinder is made from and how dirty it is.
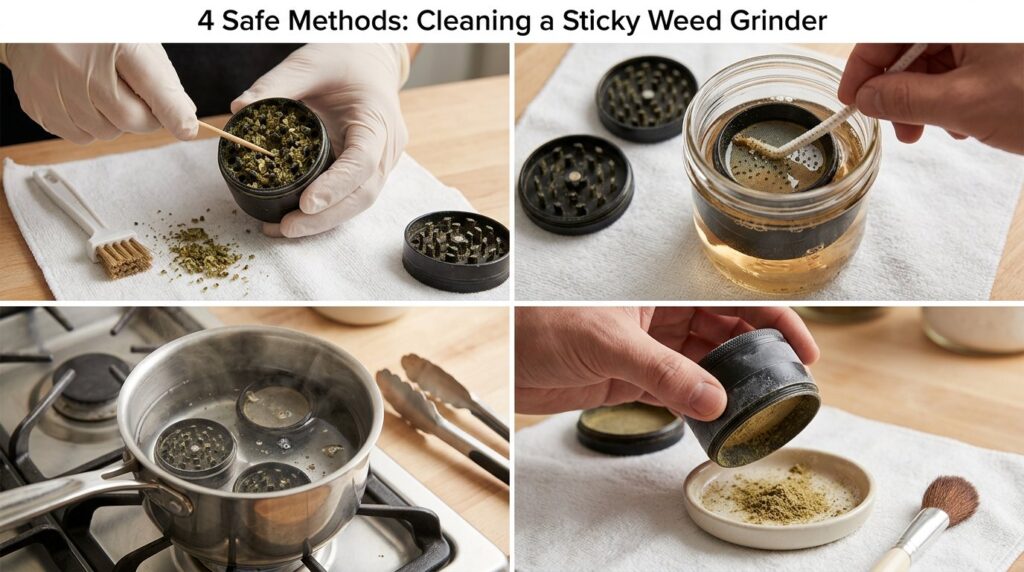
Below, you’ll find four practical methods: freezing for kief recovery, isopropyl alcohol for sticky resin, soap and water for gentle cleaning, and dry brushing for routine maintenance. You’ll also learn how to handle clogged screens, jammed threads, and material-specific cleaning without accidentally ruining your grinder.
Key Takeaways
- Learning how to clean a weed grinder restores smooth grinding and prevents cross-contamination between strains.
- Four main cleaning methods include freezing for kief recovery, isopropyl alcohol for heavy resin, soap and water for light buildup, and dry brushing for routine maintenance.
- Always identify your grinder’s material (stainless steel, aluminum, acrylic, or wood) before cleaning to prevent damage and choose a compatible method.
- Use isopropyl alcohol and salt for deep cleaning sticky resin on metal grinders, but never combine chemicals or expose alcohol to heat or flames.
- Regularly dry brush your weed grinder every few uses and deep clean based on usage frequency to maintain optimal performance and avoid stuck lids or clogged screens.
- After cleaning, fully dry all parts separately before reassembly to prevent corrosion and ensure smooth threads and screen function.
Before You Start: What You’ll Need (By Method)
Cleaning goes much more smoothly when you choose your method before dismantling the grinder. Otherwise, you may end up standing over a sink with resin on your fingers and no clean toothbrush in sight.
Use this quick guide:
| Cleaning method | Best for | Supplies |
|---|---|---|
| Freezer | Preserving and collecting dry kief | Freezer-safe bag, soft brush, clean tray, wooden pick |
| Isopropyl alcohol | Heavy, sticky resin on compatible metal | 90% or higher isopropyl alcohol, glass container, coarse salt, brush, gloves |
| Soap and hot water | Light buildup on water-safe materials | Dish soap, warm-to-hot water, bowl, soft toothbrush, towels |
| Brush and scrape | Fast maintenance | Clean toothbrush, pipe cleaners, wooden toothpicks, tray |
You may also want cotton swabs for threads and a small glass jar for recovered kief. Work over a light-coloured tray or sheet of parchment paper so loose material doesn’t disappear into the carpet.
Before applying any liquid, identify the grinder material. Bare stainless steel tolerates stronger cleaning than painted aluminum, acrylic, or wood. If you still have the manufacturer’s instructions, Santa Cruz Shredder, Brilliant Cut, and other established brands publish care guidance, follow those first.
Important: Never combine cleaning chemicals. Keep alcohol away from flames, heating elements, cigarettes, and sparks.
Step 1: Disassemble & Pre-Clean (Catch Kief, Remove Loose Herb)
Pre-cleaning prevents usable material from being washed down the drain and makes every later method more effective. Place the grinder on a stable tray, then separate each component: lid, grinding chamber, collection chamber, and kief catcher.
Don’t muscle apart resistant pieces yet. If the threads are jammed, brush around the seam and use the troubleshooting methods below rather than twisting until something bends.
How to safely empty chambers and protect the screen
Start with the upper chambers. Turn them upside down over parchment paper and tap them gently with the handle of a wooden spoon. Use a dry, soft-bristled toothbrush to sweep loose herb from the teeth and corners.
Treat the mesh screen like a tiny window screen, not a cheese grater. Brush it with light strokes from the top and bottom, supporting the rim instead of pressing the centre. A hard jab can stretch or detach the mesh.
Move collected material into a clean container and inspect it. Kief should look dry and powdery: discard anything damp, unusually discoloured, or musty-smelling. Don’t scrape painted surfaces with knives, screwdrivers, or razor blades. They can create metal shavings, strip coatings, and leave gouges that collect even more residue later.
Method 1: The Freezer Method (Best for Collecting Kief)
Cold makes resinous residue brittle, allowing it to break away without solvents. This method is ideal when your grinder still turns but has a valuable dusting of kief trapped around the teeth and screen. It won’t fully dissolve greasy buildup, so think of freezing as recovery first and deep cleaning second.
Make sure the grinder is dry. Moisture can freeze around threads and may encourage corrosion after thawing.
Step-by-step: freeze time, tapping technique, and kief storage
- Disassemble the grinder and remove loose herb.
- Place the dry pieces in a clean freezer-safe bag or sealed container. This keeps freezer odours and condensation away.
- Freeze them for 30–60 minutes. Extremely long freezing provides little added benefit.
- Remove the parts and immediately hold them over parchment paper or a clean tray.
- Tap each piece lightly against your palm or with a wooden utensil handle. Brush the teeth, grooves, and both sides of the screen.
- Use a wooden toothpick to lift stubborn flakes, keeping the point away from the mesh.
Transfer recovered kief with a small scoop or folded piece of parchment. Store it in a clean, airtight glass container in a cool, dark location. Avoid compressing it with your fingers: skin oils add moisture and make the powder clump.
Let the grinder return to room temperature before reassembly. If it remains sticky after freezing, move to an alcohol clean, provided its material is compatible.
Method 2: Isopropyl Alcohol + Salt (Deep Clean for Sticky Resin)
When the teeth feel varnished and the threads behave as though they’ve been dipped in glue, isopropyl alcohol is usually the most effective option. It dissolves stubborn resin that brushes and soapy water leave behind. This method is generally suitable for uncoated stainless steel and many bare-metal grinders, but not every finish can tolerate it.
Check the manufacturer’s instructions first. Remove all usable herb and kief before introducing alcohol: anything exposed to cleaning solution should be discarded.
Step-by-step soak: ideal % alcohol, scrub points, and rinse/dry
Use 90% or higher isopropyl alcohol when possible. It dissolves resin efficiently and contains less water than 70% alcohol, which means faster drying and less corrosion risk.
- Put compatible disassembled parts in a glass container.
- Pour in enough alcohol to cover them. Add a teaspoon or two of coarse salt for removable, solid pieces if extra abrasion is needed.
- Soak for 10–20 minutes. Heavy deposits may need up to 30 minutes, but don’t assume a longer soak is automatically safer.
- Swirl the container gently. Avoid vigorously shaking fragile screens.
- Remove each piece while wearing nitrile gloves.
- Scrub tooth bases, corners, magnet recesses, and threads with a toothbrush or cotton swab.
- Rinse thoroughly with warm water if the manufacturer permits it.
- Dry immediately with a lint-free towel, then air-dry completely.
Salt can lodge under magnets or inside fine mesh, so use alcohol without salt on delicate screens. If resin remains, repeat a short soak rather than attacking the surface with a metal tool.
Safety notes: ventilation, flammability, and food-contact concerns
Isopropyl alcohol produces flammable vapour. Work beside an open window or outdoors, away from pilot lights, stovetops, space heaters, candles, smoking materials, and electrical sparks. Never heat alcohol or place an alcohol-filled container in a microwave.
Wear gloves if you have sensitive skin, and avoid breathing concentrated fumes. Keep the container away from children and pets. Used alcohol containing resin shouldn’t be poured onto soil or into storm drains: take it to your municipality’s household hazardous waste depot or follow its disposal guidance.
Alcohol must completely evaporate before the grinder touches plant material again. Rinsing helps remove dissolved residue, but drying is non-negotiable. If you can still smell alcohol, the grinder isn’t ready.
Don’t consume the dark alcohol mixture or attempt to reclaim residue from it. Household isopropyl alcohol isn’t food-grade, and the liquid may contain coating fragments, dust, and other contaminants. A clean grinder is the goal, not a questionable kitchen chemistry experiment.
Method 3: Soap + Hot Water (Gentle Clean for Light Buildup)
Dish soap and water work well for crumbs, oils, and mild buildup when a solvent would be excessive. This is also the safer default for many plastic grinders. But, water can damage wood, corrode poorly protected metal, and creep beneath magnets, so material still matters.
Use ordinary unscented dish soap rather than bleach, powdered cleanser, or heavily perfumed products. Strong fragrances can linger in porous plastic.
Step-by-step: water temp, soak time, and avoiding rust/corrosion
Fill a bowl with hot tap water, not boiling water, and add a few drops of dish soap. Water around 43–49°C (110–120°F) is comfortably hot enough to loosen light grime without exposing plastic or adhesives to extreme heat.
Soak water-safe pieces for 10–15 minutes. Scrub the teeth, chamber edges, and threads with a soft toothbrush. Clean screen openings using gentle strokes: forcing bristles through the mesh may widen it.
Rinse until the surfaces no longer feel slippery or smell like soap. Shake off water, blot every piece, and use a cotton swab around magnet cavities and threaded grooves. Place the parts separately on a towel for several hours, overnight is safest for metal.
To limit rust or corrosion:
- Don’t soak metal longer than necessary.
- Never put grinder parts in a dishwasher.
- Dry threads and hidden recesses immediately.
- Keep wooden grinders out of water unless their maker explicitly approves washing.
If the residue remains tacky after one wash, stop scrubbing aggressively. A compatible solvent will do less physical damage than prolonged scraping.
Method 4: Brush & Scrape (Quick Maintenance Between Deep Cleans)
A two-minute dry clean can prevent the full resin apocalypse. Brushing after every few uses keeps teeth clear, reduces thread buildup, and helps kief pass through the screen rather than forming a compacted layer.
Empty the grinder over a tray while it’s dry and at room temperature. Rotate the brush around each tooth, then sweep the chamber walls and threads. Save screen cleaning for last so debris from the upper chambers doesn’t fall back onto it.
Best tools: toothbrush, pipe cleaners, wooden picks (what not to use)
A dedicated soft toothbrush handles broad areas. Firm pipe cleaners reach narrow grooves and thread valleys, while flat wooden toothpicks or bamboo picks lift compacted material from corners. A small natural-bristle paintbrush is handy for transferring kief.
Use light pressure. If a wooden pick begins to splinter, replace it immediately. Cotton swabs work on threads, though they can leave fibres on sharp teeth.
Avoid these tempting tools:
- Pocketknives and razor blades
- Steel wool or wire brushes
- Metal dental picks on coated surfaces
- Drill attachments, yes, people try this
- Compressed air aimed at an unsupported screen
Metal tools can scratch protective finishes or shed particles into the chamber. Dry cleaning won’t sterilize a grinder or remove thick resin, but it stretches the time between deep cleans and takes less time than finding the lid after it becomes permanently stuck.
How to Clean a Weed Grinder Based on Material (Avoid Damage)
A cleaning method that leaves stainless steel sparkling may cloud acrylic or strip colour from aluminum. If you don’t know the material, inspect the packaging, manufacturer’s website, or product listing before soaking anything. Treat painted, plated, and unknown finishes conservatively.
Aluminum & anodized grinders: what’s safe vs. what strips coating
For aluminum grinders, begin with freezing and dry brushing. Bare aluminum can react with harsh alkaline or acidic cleaners, while anodized aluminum has a protective oxide layer that may be damaged by abrasives and prolonged chemical exposure.
A brief wipe with isopropyl alcohol is acceptable for many quality anodized grinders, including models whose manufacturers specifically approve it. But don’t assume every colourful finish is true anodizing: inexpensive painted coatings may soften, fade, or peel.
Avoid bleach, oven cleaner, vinegar soaks, steel wool, and long alcohol baths unless the manufacturer confirms compatibility. Test alcohol on a small hidden area first. If colour appears on the swab, stop.
Also inspect chipped surfaces. Continued scraping can enlarge damaged areas and introduce coating fragments into your herb. When a grinder is visibly flaking, replacement is safer than cosmetic rescue.
Stainless steel grinders: deep-clean options and drying best practices
Stainless steel is the least fussy common grinder material. You can usually use dry brushing, hot soapy water, or a short soak in 90% isopropyl alcohol. Models such as stainless-steel Herb Ripper grinders are heavier than aluminum but tolerate rigorous routine cleaning well.
Even stainless steel isn’t invincible. Salt, moisture, and residue trapped in threads can cause staining or corrosion, especially around non-stainless magnets and hardware. After washing, towel-dry every component and clear holes or grooves with a cotton swab. Let the pieces air-dry separately overnight.
For stubborn deposits, repeat a solvent soak rather than using steel wool. Abrasive scratches create tiny channels where resin grabs hold, making the next cleanup harder. Once dry, inspect for reddish spots, pitting, or a metallic odour before reassembly.
Plastic/acrylic grinders: safest cleaning method and what to avoid
Use dry brushing first for plastic or acrylic. If more cleaning is needed, wash briefly with warm, not boiling, water and mild dish soap. Rinse well and air-dry away from direct heat.
Alcohol can cloud acrylic, weaken some plastics, and cause stress cracking around teeth or screw threads. Acetone and nail-polish remover are even worse: they may deform or partially dissolve the surface. Don’t boil plastic, place it in a dishwasher, or scrub it with abrasive powders.
Plastic grinders are inexpensive, often around $5–$15, but replacement is appropriate once teeth crack, surfaces become rough, or old odours remain after washing. Tiny plastic fragments are not a fun seasoning.
Wood requires separate care even though it isn’t a typical synthetic material: brush it dry and follow the maker’s finishing instructions. Soaking can swell the grain and ruin the fit.
Troubleshooting: Stuck Lid, Jammed Threads, and Clogged Screens
A jam usually comes from compressed material in the threads, sticky resin at the rim, or misaligned parts. The worst response is grabbing pliers and squeezing. Concentrated pressure can ovalize a round chamber, leaving it permanently difficult to turn.
Work over a tray because a stuck grinder often opens suddenly. You don’t want its contents launching across the room at the moment of victory.
How to unstick a grinder without warping it (heat vs. cold, grip tips)
First, hold the grinder upright and tap around the seam with a wooden spoon handle. Fit wide rubber bands around both sections or use silicone jar-opening pads for grip. Twist steadily in the normal opening direction: avoid jerky movements.
If resin is the problem, place the grinder in a sealed freezer bag for 30 minutes. Cold may make the buildup brittle enough to release. After removal, tap the edge gently and try again.
Mild warmth can soften resin, but use only a warm towel around a compatible metal grinder. Avoid flames, boiling water, hair dryers, and ovens, especially if alcohol has been used. Heat may weaken magnets, warp plastic, or damage adhesives.
If the threads are visibly cross-threaded, don’t force them. Alternate tiny clockwise and counterclockwise movements while keeping the pieces level. As a last resort, contact the manufacturer: premium grinder warranties may cover machining defects.
How to unclog the kief screen without tearing it
Remove all upper chambers and support the screen by holding its rigid frame. Brush both sides with a clean, dry, soft toothbrush using short strokes. Turn the screen as you work rather than repeatedly brushing one area.
For oily clogs, freeze the screen section in a sealed bag, then tap its frame over parchment paper. A wooden pick can clean around the edge, but never poke individual mesh holes, the screen can stretch or puncture.
If the material permits alcohol cleaning, pour alcohol gently through the screen or soak it without abrasive salt. Swish rather than scrub, rinse thoroughly, and let it dry overnight.
A permanently sagging, torn, or detached screen should be replaced. Continuing to use it allows larger plant particles into the kief chamber and can release loose wire strands.
Drying, Reassembly & Post-Clean Maintenance (Keep It Smooth)
Cleaning isn’t finished when the grinder looks clean. Moisture hidden beneath a magnet or inside a thread can produce corrosion, odours, and clumping after you close everything up.
Blot washed pieces with a lint-free towel and leave them disassembled in a well-ventilated area. Don’t set them on a radiator or bake them dry: excessive heat can affect coatings, magnets, and plastic components.
How long to dry, preventing rust, and keeping threads moving
Allow at least several hours after a water rinse and preferably a full night. Alcohol evaporates faster, but a grinder that was rinsed afterward still needs normal water-drying time. Check deep corners with a dry cotton swab, if it comes away damp, wait.
Before reassembly:
- Inspect teeth and threads for remaining debris.
- Smell each part: no alcohol or soap odour should remain.
- Confirm the screen is flat and secure.
- Turn threaded pieces backward slightly until they settle, then screw them together gently.
Don’t apply cooking oil, petroleum lubricant, or lip balm to the threads. These attract dust and may contact the contents. Clean, properly aligned threads generally need no lubricant. If the manufacturer sells a food-contact-safe thread treatment, use only the specified amount.
After each session, give the grinder a few taps and brush obvious crumbs from the rim. Store it closed, dry, and out of humid bathrooms or hot cars. That tiny habit prevents most stuck-lid emergencies.
How Often Should You Clean Your Grinder? (Simple Schedule)
Cleaning frequency depends on how often you grind, how resinous the material is, and whether you switch between products. There’s no medal for following a rigid calendar, so let the grinder’s performance guide you.
A practical schedule looks like this:
| Use pattern | Dry brush | Deep clean |
|---|---|---|
| Occasional use | Every 3–5 sessions | Every 2–3 months |
| Several times weekly | Weekly | Every 4–6 weeks |
| Daily or heavy use | Every few days | Every 2–4 weeks |
Clean sooner when the lid squeaks, teeth drag, threads look dark, or the screen stops passing fine material. You should also clean before switching products if flavour separation matters to you.
Resin-heavy material can gum up a grinder after only a handful of uses. A quick brush now is easier than wrestling a sealed metal puck later, future you will appreciate the favour.
FAQ: Cleaning a Weed Grinder
These are the questions that tend to appear once you’re holding a sticky grinder over the sink and reconsidering every decision that led there.
Can I boil my grinder to clean it?
Boiling generally isn’t recommended. It can warp plastic, discolour aluminum, loosen glued magnets, swell wooden components, and drive residue into seams. Sudden temperature changes may also damage coatings.
Uncoated stainless steel parts without magnets might tolerate boiling, but it rarely offers an advantage over hot soapy water or isopropyl alcohol. Manufacturer instructions should decide the issue, not a viral cleaning hack. If you’re unsure, use warm water and dish soap or a material-compatible alcohol soak instead.
What can I use instead of isopropyl alcohol?
For light buildup, use warm water, mild dish soap, and a soft toothbrush. Freezing followed by brushing is the best solvent-free approach for dry resin and trapped kief.
High-proof food-grade ethanol may dissolve resin on compatible metal, but it remains highly flammable and may damage coatings. Don’t substitute acetone, gasoline, paint thinner, bleach, or fragranced household cleaners. Vinegar is sometimes suggested online, but its acidity can react with certain metals and won’t dissolve resin as effectively as alcohol.
When the grinder material is unknown, dry cleaning is the lowest-risk choice.
How do I get all the kief out of my grinder?
You probably won’t recover literally every speck, but freezing gets close. Empty the grinder, seal its dry components in a freezer bag, and freeze for 30–60 minutes. Tap each piece over parchment paper and brush the teeth, chamber walls, and both sides of the screen.
A small cosmetic brush makes collection easier than a fingertip. Fold the parchment to create a narrow chute, then transfer the kief into an airtight glass jar. Avoid coins inside the grinder: they can dent screens, scratch coatings, and carry grime.
Only collect material that remained dry and uncontaminated. Once it has touched soap, alcohol, or a dirty work surface, discard it.
Is it safe to use alcohol on anodized aluminum grinders?
Often, yes, but only briefly and only when the manufacturer approves it. Proper anodizing is more durable than paint, yet prolonged alcohol exposure and aggressive scrubbing may dull some finishes or reveal existing defects.
Test a hidden area with an alcohol-dampened cotton swab. If the swab picks up colour or the surface changes, stop and use dry brushing or mild soapy water instead. Never soak an unknown coloured aluminum grinder overnight.
Whichever method you choose, the winning routine is simple: recover loose material, match the cleaner to the grinder, use gentle tools, and let every component dry completely. Take ten minutes to brush yours today: the next smooth, effortless turn will make the effort worthwhile.