
Blog 2026
Cross Joint Weed: How It Works and How to Roll One
Nov
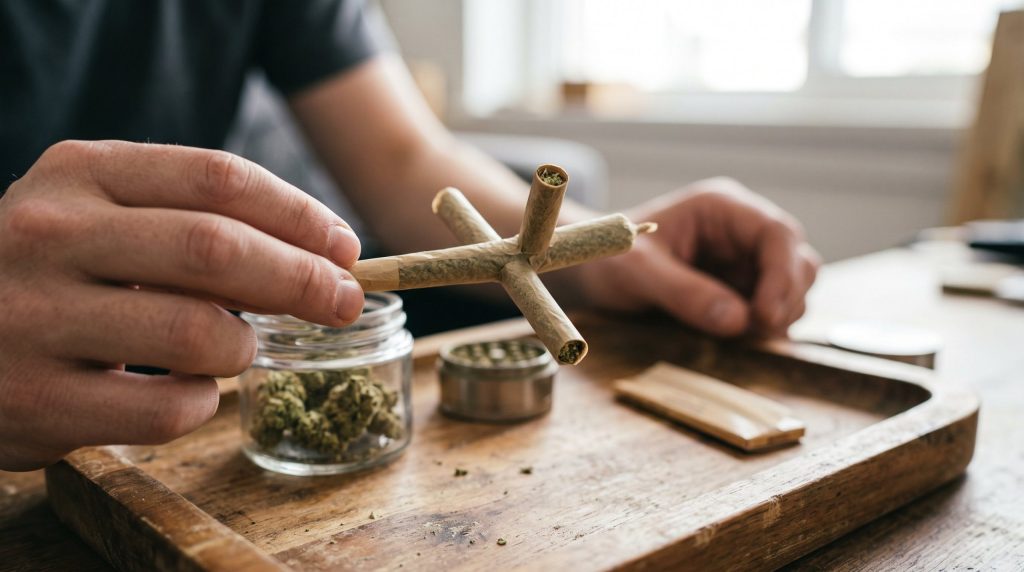
A cross joint looks like something designed by a cannabis-loving engineer after one too many action movies: one large joint pierced by a smaller joint, creating three burning tips and an unmistakable cruciform shape. It’s visually dramatic, technically fussy, and closely associated with the 2008 comedy Pineapple Express.
But cross joint weed isn’t a special strain or a guaranteed ticket to stronger effects. It’s simply cannabis flower rolled into an unusual multi-branch joint. Its performance depends on ordinary variables, flower potency, quantity, packing density, airflow, paper quality, and how evenly you light it. A well-built cross joint can burn from all three ends toward the centre. A poorly built one may leak, canoe, clog, or come apart before the first puff. Yes, it can be a tiny paper engineering disaster.
This guide explains the design, history, materials, rolling process, common failures, expected effects, and health considerations. It also compares homemade cross joints with empty cross cones and licensed ready-to-smoke products. The focus is practical education and harm reduction for adults in places where cannabis possession and use are legal, not encouragement to start smoking.
There are no affiliate relationships or paid product placements behind the brands mentioned here. Cannabis laws and product rules vary considerably, so check your provincial or territorial and local requirements before buying, carrying, assembling, or consuming anything. If you choose to proceed, use tested flower, work slowly, and remember that an elaborate shape doesn’t change the basic reality: you’re still inhaling smoke and consuming an impairing substance.
Key Takeaways
- A cross joint weed is a uniquely shaped cannabis joint consisting of a thick main joint pierced by a smaller crosspiece, creating three burning tips with a specialized airflow system.
- Rolling a cross joint requires skillful alignment of airflow channels and careful sealing to ensure smooth, even burning from all three tips without leaks or clogs.
- The potency of a cross joint depends on the cannabis flower used, not its shape; it may burn more flower faster but doesn’t inherently produce stronger effects.
- Lighting three tips requires caution and can be done alone by rotating the joint or with multiple people for simultaneous ignition, prioritizing safety and ventilation.
- Cross joints increase smoke exposure and fire risk; responsible use includes using a nonflammable ashtray, avoiding impaired activities, and adhering to local cannabis laws.
- Options to enjoy cross joints include DIY rolling, filling pre-made cross cones, or purchasing licensed pre-rolls, each with trade-offs in cost, convenience, and consistency.
Cross Joint Weed Explained: Shape, Parts, and Airflow
A cross joint consists of a thick main joint and a thinner crosspiece inserted horizontally through it. Once assembled, the main joint has a filter or mouthpiece at one end and a burning tip at the other. Both ends of the crosspiece remain exposed, giving you three tips to ignite.
The key feature isn’t the shape, it’s the hidden airflow system. Smoke from both arms must enter the main chamber and travel toward the mouthpiece. If the openings don’t line up, the crosspiece becomes decorative rather than functional.
How the Main Joint and Crosspiece Connect
The crosspiece passes through openings made on opposite sides of the main joint, usually above its midpoint and comfortably away from the filter. A separate hole through the crosspiece lets smoke move from its burning arms into the main joint.
Those openings must overlap internally. Think of two drinking straws crossing: unless both straws have holes where they meet, air can’t turn the corner. Small paper strips, often called gumming strips or seals, wrap around the intersection to close gaps and support the arms.
The connection should feel snug, not crushed. Compressing the flower too hard can block the very channel you’ve created.
Cross Joint vs. Regular Joint, Blunt, and Spliff
These products may look related, but they differ in construction and ingredients:
| Format | Wrapper | Typical contents | Burning tips | Key distinction |
|---|---|---|---|---|
| Cross joint | Rolling paper | Cannabis flower | 3 | Intersecting joints share airflow |
| Regular joint | Rolling paper | Cannabis flower | 1 | Simplest paper-wrapped format |
| Blunt | Tobacco leaf, hemp wrap, or cigar-style wrap | Usually cannabis | 1 | Larger, slower-burning wrapper |
| Spliff | Rolling paper | Cannabis mixed with tobacco | 1 | Includes nicotine-producing tobacco |
Terminology varies by region. In much of Europe, “joint” may imply cannabis mixed with tobacco, while many North American consumers call that a spliff. Whatever the name, tobacco introduces additional nicotine exposure and dependence risk.
Cross Joint History: What Pineapple Express Popularized
The cross joint became a pop-culture icon after Pineapple Express, but the movie didn’t prove who first invented it. People had been experimenting with novelty joints, multiple papers, and branching shapes long before social media could document every attempt.
Cannabis history is especially vulnerable to confident folklore. Designs were often passed between friends rather than patented, photographed, or recorded in dated publications. The safest historical claim is that the film popularized the cross joint for a mainstream audience: it didn’t necessarily originate the concept.
Origins Before the Film: Separating Evidence From Cannabis Lore
Stories attribute cross-shaped joints to unnamed growers, festival communities, Amsterdam coffeeshop culture, and underground rolling competitions. Most versions lack verifiable dates or primary sources. Similar multi-ended smoking designs likely emerged independently because the basic idea, joining paper tubes, is relatively easy to imagine.
That distinction matters when you see claims such as “the original cross joint” attached to a product. Unless documentation accompanies the claim, treat it as branding rather than settled history.
What can be established is a broader tradition of creative joint rolling. Tulip joints, windmills, braids, and multi-branch designs all predate today’s viral rolling videos.
Seth Rogen, the Movie Scene, and the Three-Tip Design
In Pineapple Express, Saul Silver, played by James Franco, presents the cross joint as the “apex of the vortex of joint engineering.” Seth Rogen’s character, Dale Denton, helps turn the oversized three-tip joint into one of the movie’s memorable props.
Rogen has discussed his familiarity with rolling cross joints in interviews and media appearances, strengthening the design’s association with him. The scene also established the ritual most viewers remember: three people lighting three tips simultaneously.
The film’s fictional Pineapple Express strain became entwined with the object, but they’re separate things. You can roll the shape with any suitably prepared cannabis flower: no pineapple flavour, secret strain, or cinematic wardrobe is required.
What You Need to Roll a Cross Joint
A successful build needs ordinary rolling supplies plus a narrow tool for forming airflow openings. Fresh, flexible papers matter more than fancy branding. Old papers crack when folded, while excessively wet adhesive can wrinkle or tear around the intersection.
Work on a clean tray under bright light. A dropped crosspiece is surprisingly good at vanishing into carpet, nature’s least amusing scavenger hunt. Keep children, pets, fans, candles, and drinks away from the workspace.
Materials Checklist: Flower, Papers, Filter Tip, and Piercing Tool
You’ll need:
- Legally purchased, lab-tested cannabis flower
- One large paper for the main joint
- One smaller paper for the crosspiece
- A paper or reusable filter tip
- A grinder or clean fingers for breaking up flower
- A rolling tray
- A thin, blunt piercing tool, such as a clean toothpick
- Spare adhesive strips cut from rolling papers
Popular papers from RAW, OCB, Elements, and Zig-Zag come in several sizes. King-size slim papers generally provide more working room than single-wide papers.
Avoid needles, knives, or improvised sharp metal. They can cause injury and are more likely to slice the paper than create a controlled opening.
Planning Joint Sizes, Flower Quantity, and Packing Density
The main joint must be wide enough to hold the crosspiece without splitting. As a practical starting point, make the crosspiece roughly half the diameter of the main joint and leave enough empty paper at both ends to twist them closed temporarily.
Total flower use varies with paper size and density, but a cross joint commonly requires considerably more material than a standard personal joint. Don’t chase an arbitrary gram count. Build for proportion and recognize that you don’t have to finish it.
Use an even, medium-fine grind. Powdery flower restricts airflow and burns quickly: chunky pieces create gaps. The final pack should feel springy under light pressure, not hard like a wooden dowel.
How to Roll a Cross Joint: Step-by-Step Guide
Rolling a cross joint is intermediate paper craft, not beginner magic. The order matters: build both components, create aligned air channels, join them, and test the draw before anything is lit.
You’re working with dry plant material and delicate paper, so use light pressure. If your first version looks less like a movie prop and more like a wounded airplane, welcome to the club. Function matters more than symmetry.
1. Roll the Main Joint With a Filter Tip
Place the filter at one end of the larger paper. Distribute ground flower so the joint is widest around the future intersection and slightly narrower toward the lighting tip. Shape it gently, tuck the paper, and seal the adhesive edge.
Leave enough unfilled paper at the lighting end to twist closed. This prevents flower from spilling while you assemble the crosspiece.
The main joint should be firm enough to support two arms without collapsing. Before moving on, take an unlit draw through the filter. You should feel moderate resistance. If it already feels blocked, loosen the pack now: adding a crosspiece won’t improve it.
2. Roll a Slimmer Crosspiece With Both Ends Exposed
Roll a short, narrow joint without a filter. Keep the flower evenly distributed across its middle and leave extra paper at both ends. Twist each end closed during assembly so the contents stay in place.
The crosspiece should be slim enough to slide through the main joint without forcing the paper apart. It also needs sufficient length for balanced arms on both sides. If one side is much longer, it will contain more flower and may burn at a different rate.
Roll this component slightly looser than you might expect. Once pierced and inserted, the surrounding paper compresses it. Starting with a rock-hard pack often produces blocked airflow.
3. Make Aligned Openings for the Crosspiece and Airflow
Using a clean, blunt toothpick, form a passage through both sides of the main joint. Start with a small opening, then widen it gradually by rotating the tool. Don’t jab, slow pressure reduces tearing.
Next, make a small hole through the centre of the crosspiece. This opening must sit inside the main joint after insertion, allowing smoke from both arms to enter the main chamber.
Alignment is the make-or-break step. Estimate the width of the main joint and mark the centre of the crosspiece lightly with a fold or fingertip. Openings that sit outside the intersection leak smoke instead of routing it toward you.
4. Insert the Crosspiece and Seal the Intersection
Gently feed the crosspiece through the main joint, turning it slightly rather than pushing straight against resistance. Stop when both arms are approximately equal and the crosspiece’s airflow hole sits inside the main chamber.
Cut or tear narrow adhesive strips from spare rolling papers. Moisten them lightly and wrap them around all four seams where the arms meet the main joint. Your goal is an airtight collar, not a papier-mâché sculpture.
Let the seals dry for a minute. Supporting the main joint near the intersection, test whether the arms sag. Add another small strip only where needed: excessive layers can burn unpredictably and add unnecessary paper smoke.
5. Check Airflow and Structural Stability Before Lighting
Remove or loosen the twists at all three burning tips, then take a gentle unlit draw through the filter. Air should enter from the main tip and both crosspiece ends. Test each opening by covering the other two with your fingertips and drawing separately.
If one arm produces no airflow, adjust the central hole with the blunt tool rather than squeezing the joint. Listen for a faint whistle and feel for air at the uncovered end.
Finally, hold the joint horizontally over your tray. The intersection shouldn’t rotate, crack, or shed flower. Fixing a leak while everything is cool is easy. Fixing it after three tips are glowing is… considerably more exciting.
Lighting a Cross Joint: Managing Three Burning Tips
Lighting all three tips evenly is harder than rolling them. The familiar movie method uses three people, but one person can rotate the joint and ignite each end in sequence. Either way, do it outdoors where permitted or in a well-ventilated legal-use setting, away from dry grass, fabric, hair, and flammable liquids.
First, toast each tip by holding the flame nearby while rotating the joint. Then apply a brief flame during a gentle draw. Avoid prolonged torch-style heating: it can char one side, ignite the seals, or drop embers.
Watch the burn lines during the first minute. If one arm races ahead, stop drawing and let it cool while touching up the slower tips. Small, slow puffs work better than hard pulls, which increase heat and encourage canoeing.
Keep a stable ashtray directly underneath. Cross joints produce embers from three directions, and the side arms may drop ash without warning. Don’t pass one over someone’s lap, leave it unattended, or try to relight it while driving. If the structure becomes loose, extinguish it completely rather than performing hot-paper surgery.
Troubleshooting Common Cross Joint Problems
Most cross joint failures come from four variables: uneven packing, poor alignment, leaky seams, or rushed lighting. Diagnose one issue at a time. Constantly poking and wrapping the joint can turn a small airflow problem into a shredded-paper problem.
A useful rule: air must enter at three tips, pass through one intersection, and exit through one filter. Test that route whenever performance changes. If you can’t restore it safely after lighting, extinguish the joint, let it cool fully, and salvage the unburned flower where legally appropriate.
Uneven Burning: Why One Arm Burns Faster
One arm may burn faster because it is shorter, more loosely packed, drier, exposed to wind, or more fully lit. A tilted joint also sends heat upward, making the upper side burn differently.
To correct an early imbalance:
- Pause inhalation and rotate the joint.
- Shield it from wind.
- Add a tiny touch of flame to the lagging edge.
- Lightly moisten the paper ahead of a racing burn line.
Don’t soak the paper or lick a hot joint. If an arm is nearly finished while the others remain long, extinguish everything and reassess. Continuing may overheat the intersection and cause the crosspiece to detach.
Blocked Airflow: Tight Packing and Misaligned Openings
A difficult draw usually means the flower is too compressed, the grind is too fine, or the crosspiece opening doesn’t overlap the main chamber. Resin and condensation can also narrow the pathway after repeated use.
Before lighting, cover two tips and test the third. A blocked arm can sometimes be opened by gently rotating a blunt toothpick through its centre channel. Work from the tip and stop before reaching the intersection: aggressive probing can push flower into the main joint.
After lighting, don’t insert tools into hot material. Extinguish the joint, allow it to cool, and then inspect it. Pulling harder isn’t a fix, it raises combustion temperature and may draw hot ash toward the filter.
Leaks, Tears, and a Loose Intersection
A leak often announces itself with thin smoke escaping around the centre or a draw that feels strangely effortless. For an unlit joint, apply a small adhesive strip over the exact gap and let it dry. Covering the entire intersection usually adds bulk without solving the source.
Small tears away from the burn line can be patched with clean rolling paper. A split beside an active ember is different: extinguish the joint and wait until it’s cool.
If an arm rotates or slides, the hole in the main joint is probably too large. Support it with a narrow paper collar. When the main body itself is badly torn, dismantling and rerolling is safer than balancing burning pieces with hopeful optimism.
What to Expect: Potency, Smoke, and Cannabis Consumption
A cross joint can deliver a larger amount of smoke than a standard joint because three burning surfaces feed one mouthpiece. It may also consume flower faster while sitting between puffs. That doesn’t make every inhalation predictably stronger, but it makes accidental overconsumption easier, especially in groups where passing happens quickly.
Effects depend on THC concentration, cannabinoid profile, personal tolerance, inhalation pattern, and total amount consumed. Onset from inhaled cannabis generally occurs within minutes, yet effects can continue building after you stop. Take one small puff, wait, and reassess rather than trying to “keep up” with all three tips.
Why a Cross Shape Does Not Automatically Mean Stronger Effects
Geometry doesn’t create THC. If a regular joint and a cross joint contain the same flower, the flower has the same labelled potency. The cross joint may expose more material to combustion and produce denser or more frequent smoke, but much of that smoke can drift into the air between puffs.
The shape hence changes delivery and consumption rate, not the underlying chemistry. A small cross joint made with low-THC flower may feel milder than a compact regular joint made with highly potent flower.
Your tolerance also matters. Someone who rarely uses cannabis may experience intense impairment from a few inhalations, while a frequent consumer may report less noticeable effects from the same product.
Infused vs. Non-Infused Cross Joints: Why THC Content Matters
An infused joint may contain cannabis oil, distillate, kief, hash, or concentrate-coated flower. These additions can raise total THC dramatically and make burning less predictable. Oil may clog the intersection: kief-heavy arms can burn at different speeds.
Compare labels using total THC per package where available, not just a large percentage printed on the front. A licensed product should identify ingredients, serving or package size, cannabinoid content, batch information, and testing details.
Beginners should avoid combining a complicated three-tip design with high-potency concentrates. Mixing cannabis with alcohol, sedatives, or other intoxicants can further impair judgment and coordination. More elaborate doesn’t mean more enjoyable: sometimes it just means harder to dose.
Health and Safety: Smoke Exposure, Impairment, and Fire Risk
Cannabis smoke contains fine particles and many of the same combustion-related toxins and irritants found in tobacco smoke. According to Health Canada’s guidance on cannabis health effects, smoked cannabis can harm the lungs and make it harder to breathe, and cannabis smoke contains many of the same harmful chemicals found in tobacco smoke. A filter tip may keep loose flower out of your mouth, but it doesn’t make smoke safe.
A cross joint can increase secondhand smoke and fire exposure because three ends remain lit. Use a nonflammable ashtray, keep water nearby, and fully extinguish every tip. Never use cannabis around oxygen equipment, fuel, dry vegetation, or sleeping people.
THC can affect reaction time, attention, balance, and decision-making. Don’t drive, cycle in traffic, operate machinery, cook over open flame, swim alone, or supervise children while impaired. Store flower and finished joints in child-resistant containers, clearly separated from ordinary cigarettes or food.
Cannabis may pose additional risks during pregnancy or breastfeeding and for people with certain cardiovascular or mental health conditions. It can also interact with medications. Ask a qualified clinician for personalized guidance rather than relying on a package slogan or your friend who has “done extensive research” on the couch.
If someone develops chest pain, has trouble breathing, loses consciousness, becomes dangerously confused, or experiences severe panic that doesn’t ease, seek medical help. In Canada, call 911 for emergencies or your poison centre at 1-844-POISON-X (1-844-764-7669) (in Quebec, 1-800-463-5060) for case-specific guidance.
DIY vs. Premade Cross Cones vs. Ready-to-Smoke Pre-Rolls
You have three basic options where legal: roll the complete structure yourself, fill a premade empty cross cone, or buy a licensed pre-roll already filled. Availability varies sharply by province and territory because novelty shapes are niche products and each province or territory sets its own rules for cannabis retail.
Empty cones reduce paper engineering but still require careful filling. Ready-to-smoke products offer convenience, though consistency depends on the manufacturer and storage. None eliminates the need to inspect seams, confirm airflow, and read the label.
Comparing Cost, Convenience, Assembly, and Consistency
| Option | Upfront cost | Skill needed | Main advantage | Main drawback |
|---|---|---|---|---|
| DIY papers | Usually a few dollars plus flower | High | Full control over size and material | Highest failure rate |
| Empty cross cone | Often priced above ordinary cones | Moderate | Shape is preformed | Can clog during filling |
| Licensed filled pre-roll | Market-dependent | Low | Ready to use | Limited availability and higher total price |
Prices vary by taxes and jurisdiction. Ordinary papers may cost roughly C$2–5 per pack, while novelty cones often cost several dollars each before flower. Licensed infused pre-rolls can cost far more than basic single joints.
Choose based on your patience as much as your budget. If ordinary joints still unravel in your hands, a premade cone may prevent an evening of muttering at tiny pieces of paper.
Checking Product Labels, Testing Information, and Local Legality
Buy filled pre-rolls only from licensed retailers where regulated sales are available. Check for:
- THC and CBD content
- Net cannabis weight
- Added concentrates, terpenes, or tobacco
- Batch or lot number
- Testing laboratory information
- Packaging and expiration dates
- Required government warnings
Avoid products with misspelled labels, imitation candy branding, no batch information, or unsupported claims such as “pesticide free” without testing documentation. Examine the paper for moisture damage, discolouration, broken seals, or visible mould.
Provincial legality doesn’t automatically permit public consumption, taking cannabis across the border, home assembly, or possession above local limits. Employer, housing, First Nations, federal-property, and vehicle rules may also apply. Verify current guidance through your provincial or territorial cannabis rules instead of assuming a dispensary receipt permits use everywhere.
Frequently Asked Questions About Cross Joints
Cross joint weed attracts plenty of myths, mostly because the design entered popular culture before many people understood how it worked. These quick answers cover the practical questions first-time rollers ask most often.
Is Rolling a Cross Joint Suitable for Beginners?
Not usually as a first rolling project. You need to produce two stable joints, create aligned openings, seal four seams, and balance three burn rates. If you can reliably roll an ordinary joint with an even draw, you’re ready to try.
Beginners can practice the structure with legal non-consumable herbs or empty paper tubes before using cannabis. Another option is an empty cross cone, which removes the hardest paper-joining step but still requires patient, even filling.
Don’t treat a failed build as wasted talent. Cross joints are novelty craft projects. A plain, well-made joint is more practical and often burns better.
Does a Cross Joint Require Pineapple Express Flower?
No. Pineapple Express is a cannabis cultivar name and the title of the movie that popularized the shape: it isn’t a construction requirement. Any legally obtained flower with a workable moisture level can be used.
Very dry flower may crumble into powder and burn too quickly. Damp flower packs unevenly, clogs airflow, and may indicate poor storage. Properly cured flower should break apart without turning to dust and shouldn’t smell musty or show fuzzy growth.
Strain names are also inconsistent between producers. Use the regulated label’s cannabinoid results and ingredient information instead of assuming every product called Pineapple Express has identical potency or effects.
Do You Need Three People to Light a Cross Joint?
No. Three people make simultaneous lighting easier, and recreate the famous movie moment, but one person can toast and light each tip in sequence. Two people can divide the job as well.
Whichever approach you choose, coordinate before introducing flame. Keep faces, sleeves, and hair away from the side arms, and hold the joint over a large ashtray. If lighting becomes awkward, extinguish it rather than chasing an ember around the room.
Eventually, a cross joint is memorable because it combines craft, spectacle, and cannabis culture. Build one only where legal, keep the dose modest, and prioritize airflow over Instagram-perfect symmetry. If you’re new to cannabis, a lower-potency single joint is easier to control. The smartest cross joint weed decision may be stopping after one puff, or deciding that ordinary rolling paper is exciting enough for tonight.