
Cannabis
How to Roll a Joint: 4 Easy Steps for an Even Burn
Nov
Rolling your first joint can feel oddly high-stakes: one thin paper, a pile of herb, and fingers that suddenly forget how fingers work. The good news? It’s a learnable hand skill, not an ancient art reserved for the naturally dexterous.
This beginner-friendly guide explains how to roll a joint by hand, from choosing papers and preparing a filter tip to sealing, packing and lighting it evenly. You’ll also learn how to fix common problems such as canoeing, restricted airflow and loose rolls. The focus is traditional dried cannabis flower, not tobacco, concentrates, infused products or automated rolling machines.
In Canada, you need to be of legal age in your province or territory to buy, have or use cannabis: 19 in most of the country, 18 in Alberta and 21 in Quebec. [VERIFY] Never drive or operate machinery after smoking, and if you’re new, start with a small amount, because potency varies considerably from one strain and batch to the next. Kush Station sells some of the papers and accessories mentioned below, but brand names here are just reference points: none of them is required to roll a good joint.
Now, clear a flat surface. Chasing ground flower across a carpet is nobody’s idea of a relaxing evening.
Key Takeaways
- Rolling a joint is a learnable hand skill: pick the right paper, make a filter tip, and pack dried cannabis flower evenly without overcompacting it.
- 1¼ rolling papers and a properly made filter tip give beginners a manageable size and good airflow.
- Grind cannabis to a coarse, fluffy consistency and keep it at the right moisture for an even burn and a smoother smoke.
- The core steps are: shape the paper around the tip, fill it evenly, tuck and seal, then pack the top while keeping the airway open.
- Light a joint by slowly rotating it while heating the whole rim. That’s the best way to prevent canoeing.
- Most problems (runs, canoes, hard draws) come down to packing density, gaps in the paper, or a seal that didn’t hold.
- In Canada, provincial and territorial rules decide where you can smoke, and driving after use is a Criminal Code offence. [VERIFY]
What Do You Need to Roll a Joint? (Tools, Papers, Filter Tips)
You don’t need an elaborate rolling tray or a cabinet full of accessories. A clean plate, cutting board or hardcover book makes a perfectly decent workspace.
Your basic setup includes:
- Dried cannabis flower: Roughly 0.3 to 0.5 grams is manageable for a beginner using a standard paper. Smaller, budget-friendly buds such as popcorn flower work just as well once ground.
- Rolling paper: A 1¼-size paper offers enough room without becoming unwieldy.
- Filter tip or crutch: Use purpose-made tip paper or thin, uncoated card.
- Grinder: A basic two-piece grinder works; scissors are an acceptable backup.
- Packing tool: The blunt end of a match, a chopstick or a slim pen is enough.
- Lighter: A standard butane lighter gives you more control than a torch.
Avoid glossy business cards, receipts or printed packaging for tips. Their coatings and inks aren’t meant to be heated and inhaled. Likewise, use real rolling papers rather than notebook paper, printer paper or gum wrappers.
If you’re putting together your first kit, our cannabis starter kit for beginners covers the basics beyond rolling.
Choosing rolling papers: sizes, materials and glue strip basics
For a first attempt, 1¼ papers are the sweet spot. Single-wide papers can feel cramped, while king-size papers need more material and better shaping. Pre-rolled cones are easier, but they teach you packing rather than hand-rolling.
| Paper type | Handling | Burn characteristics | Best suited to |
|---|---|---|---|
| Wood pulp | Forgiving and easy to see | Usually faster | First-time rollers |
| Hemp | Moderately firm | Steady when packed evenly | Everyday use |
| Rice | Very thin and delicate | Typically slow | Experienced hands |
| Flax or mixed fibre | Thin but manageable | Varies by brand | A lighter paper feel |
RAW Classic 1¼ and OCB Premium are common reference points, and flavoured papers are another option if you want something different. Availability and prices vary, and brand matters less than buying intact, undamaged papers. You can browse what’s in stock in our rolling paper section.
Hold the paper with the glue strip facing you and running along the upper edge. The paper should form a shallow trough. Check the package instructions if the strip is hard to find: on some ultra-thin papers, it’s nearly invisible.
How to make a joint filter (crutch) tip: simple fold and roll method
A crutch gives the joint structure, keeps crumbs out of your mouth and helps preserve airflow. It doesn’t filter smoke the way a cigarette filter does; “filter tip” is mostly shorthand. (New to terms like crutch, cherry or canoe? Our cannabis glossary for beginners and weed slang guide explain them.)
Cut or tear a strip of uncoated card about 2 cm wide and 5 cm long. Purpose-made tips from brands such as RAW or Elements are already close to the right size.
- Make three or four small accordion folds at one end, each about 3 mm wide.
- Roll the rest of the card around those folds.
- Let it spring open slightly until its diameter matches the joint you want.
Viewed from the end, the folds may look like a W or a tiny zigzag. That centre shape helps stop loose particles without closing the airway. Don’t roll the card into a solid spiral: it can tighten as you smoke and create a clog. If your tip keeps unrolling, hold it closed for a few seconds or tuck it into the paper right away.
Grinding and moisture: getting the right consistency for an even burn
Your flower should look like coarse, fluffy crumbs, not powder and not marble-sized chunks. A grinder produces the most consistent texture. Give it a few turns, open it, and check before grinding further. Pulverized flower packs too densely and may restrict airflow. Our beginner’s guide to grinding cannabis walks through five easy methods, with or without a grinder. If your grinder has a bottom chamber, it will slowly collect kief, the fine trichome dust that falls off the flower (more on that in hash vs kief vs rosin).
Moisture matters just as much. Flower that’s too dry becomes dusty and burns hot; flower that’s damp clumps together, rolls poorly and keeps going out. Ideally, it should feel slightly springy without sticking to your fingers.
Remove hard stems before filling. They create empty pockets and can puncture thin paper at exactly the wrong moment (usually after you’ve nearly finished, naturally).
If the flower seems damp, leave it out in a clean, shaded spot for several minutes rather than applying direct heat. If it’s very brittle, proper storage in an airtight container with a humidity-control pack, such as a 58% or 62% Boveda pack, can improve future batches. Canadian winters and indoor heating dry flower out quickly, so storage matters here more than you might think. See how to store weed and keep it fresh for the details. Don’t try to rehydrate flower quickly with fruit peel: that can add excess moisture, odours and mould risk.
How to Roll a Joint (Step-by-Step)
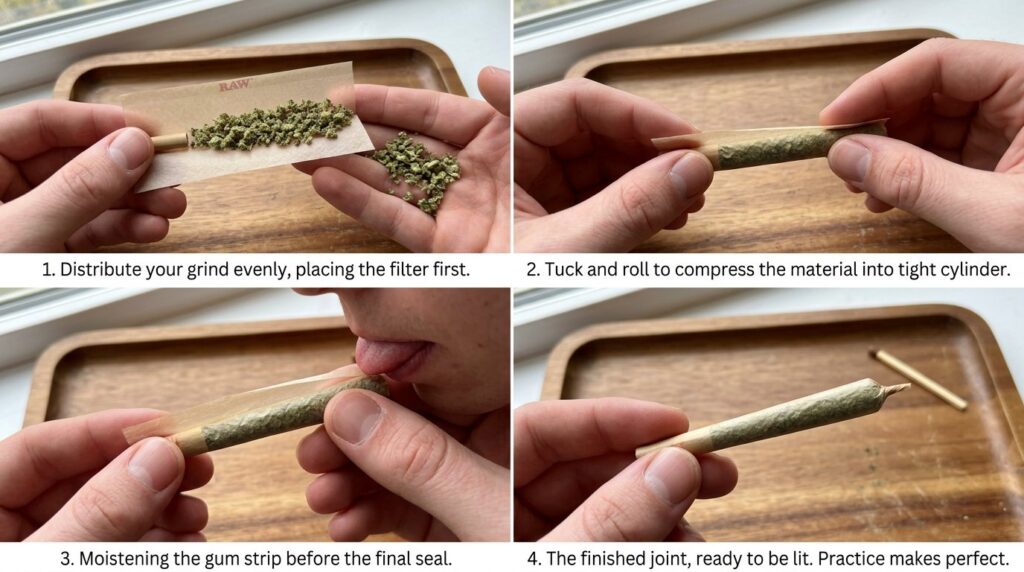
Here’s the core process. Your first joint probably won’t look like the tidy little cylinders pictured on packaging. That’s fine. Focus on three things: consistent density, an open airway and a complete seal.
A standard 1¼ paper usually holds around 0.3 to 0.5 grams comfortably. Too much makes the tuck difficult; too little leaves the paper floppy. Work over your tray so escaped flower goes back into the roll instead of onto the floor.
Step 1: Prep the tip and place it in the paper
Place the paper in front of you with the glue strip at the top, facing inward toward you. Form it into a shallow U-shaped trough. Set your prepared tip at either end: right-handed rollers often put it on the right, but there’s no rule.
Line the tip up with the paper’s lower edge and leave about 3 mm of paper beyond its outer end. That tiny margin makes the finished mouthpiece cleaner. Hold the tip gently between your thumb and index finger so it doesn’t escape while you add flower.
Decide on the shape now. For a straight joint, keep the tip and open end at roughly equal widths. For a cone, use a smaller tip and gradually add more flower toward the opposite end.
If the paper keeps flattening, pinch a light crease along the bottom before filling it. Don’t make a sharp fold from end to end, though: it can stop the flower from settling into a rounded shape.
Step 2: Fill and shape the herb (even distribution, no soft spots)
Sprinkle the ground flower along the paper, starting beside the tip and working outward. Use your fingertips to spread out high spots. The area right next to the crutch deserves special attention: an empty gap there can make the joint bend or collapse.
Now pinch the paper between both thumbs and index fingers. Roll it gently back and forth, without closing it yet, to shape the flower into a cylinder. Imagine rolling a pencil under a towel: enough pressure to set the form, but not enough to crush everything flat.
Check the full length for soft spots. A hollow section burns faster than a dense one, which increases the chance of a run. Add a small pinch where needed and repeat the shaping motion.
Some flower may fall out at this stage. That’s normal, especially on attempt number one. Scoop it back onto the paper instead of squeezing harder. Firm and springy is the goal; rock-solid is not.
Step 3: Tuck, roll and seal (lick line, seal direction, smoothing)
The tuck is where beginners most often get stuck. Start at the tip, because its firm edge gives the paper something to wrap around. Using your thumbs, guide the lower, non-glued edge over the shaped flower and tuck it under the far side of the paper.
Once the edge catches around the tip, continue the tuck along the joint. Roll upward slowly while keeping light, even tension. If the paper wrinkles, back up slightly and smooth it rather than powering through.
When only the glue strip is left, lightly moisten it from one end to the other. You want damp, not drenched: too much moisture can weaken or tear the seam. Press the glued edge down starting at the tip and moving toward the open end. This direction helps lock in the joint’s shape.
Run a fingertip gently along the seam to smooth out bubbles or loose patches. Give it 10 to 20 seconds to set before packing. If a small section won’t stick, dampen only that spot and press again.
Step 4: Pack the top and twist to finish (tightness control)
Hold the sealed joint upright with the open end facing up. Tap the tip lightly against your tray a few times and let gravity settle the contents. Then use a matchstick, chopstick or similar blunt tool to press the top layer down.
Pack in small steps. Jamming the tool deep into the joint can compact the centre and choke the airflow. If the top sinks a lot, add another pinch of flower and tamp it gently.
Before finishing, take an unlit test draw through the tip. You should feel mild resistance, similar to sipping through a straw, not the cheek-collapsing effort of a thick milkshake. If the draw is blocked, massage the joint lightly between your fingers to loosen dense areas.
Twist the extra paper at the open end into a short wick, or fold it inward for a flatter finish. A twist keeps the flower in during transport, but remove or carefully burn off the excess before lighting. Finally, roll the joint gently between your fingers to find any last soft spots.
Lighting a Joint Correctly for an Even Burn
A beautifully rolled joint can still canoe if you light one side and immediately inhale like you’re starting a campfire. The goal is to light the entire rim evenly before taking a normal draw.
First, remove the twisted paper tip or flatten it so excess paper doesn’t create a large ash flake. Hold the joint at a slight upward angle and bring the flame near the open end. Rotate the joint slowly while heating the whole circumference. You don’t need to bury it in the flame.
Once the rim starts glowing, take one or two short, gentle puffs while continuing to rotate it. Look at the ember. You want a complete orange ring, often called the cherry, rather than one bright patch.
Quick check: If only half the rim is glowing, relight that section before continuing. Ten seconds of correction now can save several minutes of repair work later.
During use, draw slowly and leave a little time between puffs. Forceful, frequent inhalations raise the temperature and encourage uneven burning. Keep the joint angled slightly upward rather than pointing straight down.
A note on health: smoking is the highest-risk way to use cannabis. Health Canada’s Lower-Risk Cannabis Use Guidelines suggest that if you do smoke, you avoid deep inhalation and breath-holding, which increase the amount of smoke your lungs take in, and that you don’t mix cannabis with tobacco. [VERIFY: add canada.ca link] If you want to avoid smoke altogether, compare the options in edibles vs smoking weed, and if you’re new, read our THC dosage guide for beginners first.
Never leave a joint burning unattended. Put it out fully in a non-flammable ashtray when you’re done, and never flick a roach onto dry grass or out a car window, especially during summer fire bans in many parts of Canada.
Troubleshooting: Fix Canoeing, Runs, Loose Joints and Clogs
Even experienced rollers sometimes produce something shaped like a bent carrot. Work out the symptom before trying to fix it: endlessly relighting a bad spot can make the imbalance worse.
| Problem | Likely cause | Practical fix |
|---|---|---|
| Canoeing or one-sided burn | Uneven density or incomplete lighting | Wet the paper just below the fast-burning side, then relight the slower side |
| Long run down one edge | Seam gap, stem or hollow channel | Press the gap closed; apply a narrow paper patch if needed |
| Loose, floppy joint | Not enough shaping or filling | Tap it tip-down, add flower at the top and pack lightly |
| Difficult draw | Overpacking, fine grind or tight tip | Gently massage dense sections and carefully widen the tip opening |
| Joint keeps going out | Damp flower or overly tight packing | Loosen it with a light roll between your fingers; let damp flower dry before rerolling |
| Hot crumbs reach your mouth | Loose tip or wide airway | Insert a better-fitting crutch or reroll with a zigzag centre |
For a small tear, take the glued edge from another rolling paper, trim it into a narrow patch, and seal it over the hole. Use as little extra paper as possible: a giant papier-mâché bandage will affect the burn.
If airflow is completely blocked, don’t keep inhaling harder. Open the top, remove a little flower and loosen the centre carefully. Sometimes rerolling is genuinely faster, and less annoying, than rescuing a badly overpacked joint.
Different Ways to Roll a Joint: Cone vs Straight, With or Without a Filter, and Quick Hacks
Once you understand the basic tuck, you can adjust the format to suit your situation. None is universally “best”: the right choice is the one you can roll consistently.
Straight joints are easiest to shape because the fill stays fairly even from end to end. They’re an excellent starting point and usually need less flower. Cones widen toward the lit end, giving more room and a slow-to-full smoking progression, but uneven filling near the narrow tip can restrict airflow.
How to roll a joint with papers without a filter
Rolling without a tip is possible, and it’s one of the most searched variations. Leave one end slightly emptier, roll the joint as usual, then pinch or fold the mouth end so the flower stays in place. Twisting a little paper at that end also works. The trade-off: an unreinforced end can get soggy or collapse, and it’s easier to pull loose bits into your mouth. So, do you need a filter to roll a joint? No, but beginners generally have better results with a crutch.
Quick roll hacks
If hand-rolling isn’t cooperating, try one of these shortcuts:
- Pre-rolled cones: RAW, OCB and Elements sell empty cones you can fill and tamp in layers.
- Rolling machines: Compact devices from brands such as Zig-Zag make consistent straight rolls, as long as you don’t overfill them.
- The boat fold: Fold up the paper ends slightly before filling to reduce spills, then flatten them during the tuck.
- Two-stage practice: Rehearse the shaping and tuck with clean dried kitchen herbs, throw them out, and use cannabis only once the movement feels natural.
Cones and machines sacrifice some control, but there’s no medal for making the process harder. If you have limited hand mobility or tremors, a cone plus a small funnel may be the most comfortable option. And if you’d rather skip rolling altogether, a ready-made weed joint is the simplest route; our guide to how cannabis pre-rolls work explains what to look for.
Thinking about a blunt instead? Blunts use a tobacco-leaf or hemp wrap rather than a paper, which changes the size, burn and (with tobacco wraps) the health picture. See joint vs blunt for the differences.
Rolling and Smoking a Joint in Canada: What to Know
Recreational cannabis has been legal across Canada since October 17, 2018, under the federal Cannabis Act (here’s the full legalization timeline). The federal law sets the basics, but provinces and territories decide much of what matters for a joint: the legal age and where you’re allowed to smoke. [VERIFY]
- Legal age: 19 in most provinces and territories, 18 in Alberta, 21 in Quebec. [VERIFY]
- How much you can carry: Adults can have up to 30 grams of dried cannabis (or the equivalent) in public. [VERIFY]
- Where you can smoke: It varies a lot. Some provinces allow smoking cannabis in many places where tobacco smoking is allowed, while others restrict it to private residences. Bars, restaurants, workplaces and other enclosed public spaces are smoke-free everywhere, so you can’t roll up and light a joint in a bar. Landlords and condo boards can also ban smoking in rental units and buildings. Check your province’s rules before you light up. [VERIFY]
- Driving: Driving while impaired by cannabis is a Criminal Code offence, and police can test for THC. Don’t smoke in a vehicle, even as a passenger, and keep cannabis sealed and out of reach while driving. [VERIFY]
- Travel: Taking cannabis across the Canadian border, in either direction, is illegal, even to or from places where it’s legal. [VERIFY]
Wherever you smoke, be considerate: ask before lighting up around others, keep smoke away from kids and pets, and pass the joint the way others expect. Our cannabis etiquette guide covers the unwritten rules, and these tips for getting rid of weed smell help keep the peace with neighbours. Store your flower, papers and lighters where children and pets can’t reach them; see safe storage of cannabis.
Practice Makes Even Burns
To improve, try rolling the same modest amount three times rather than making one oversized joint. You’ll learn faster by comparing firmness, airflow and seams. Keep the best one, carefully recover the flower from the others, and reroll as needed.
Choosing what to roll matters too. If you’re new, a lower-potency flower makes for a gentler first joint (see low-THC cannabis for a gentle start), and best weed for beginners suggests strains and products to start with. Whether you reach for indica strains, sativa strains or hybrids, check the THC on the label first; how to read a cannabis label shows you what the numbers mean.
In the end, learning how to roll a joint comes down to repeatable fundamentals: use an even grind, shape before tucking, keep gentle tension and test the airflow before lighting. Your early attempts may look wonky, but they can still work perfectly well. Start small, consume responsibly and follow your province’s cannabis laws. A neat roll is satisfying, but an even-burning, comfortably packed joint is the real win.
Frequently Asked Questions About How to Roll a Joint
What do you need to roll a joint?
You’ll need dried cannabis flower (about 0.3 to 0.5 grams), rolling papers (1¼ size is ideal for beginners), a filter tip or crutch, a grinder or scissors, a packing tool like a matchstick, and a butane lighter.
How do I make a filter tip or crutch for my joint?
Cut a strip of uncoated card about 2 cm wide and 5 cm long. Make three or four small accordion folds at one end, then roll the rest of the strip around the folds and let it spring open slightly to fit your joint’s diameter. This shape blocks crumbs while keeping the airway open.
What is the best way to fill and shape cannabis in the paper for an even burn?
Sprinkle ground cannabis evenly along the paper beside the tip, spread out any high spots, then gently roll the paper back and forth to shape the flower into a uniform cylinder. Aim for consistent density and an open airway, not a tightly crushed fill.
How can I fix a joint that is burning unevenly or “canoeing”?
Uneven burning usually comes from uneven density or incomplete lighting. Lightly wet the paper just below the fast-burning side, then relight the slower side while rotating the joint so the whole rim glows.
What rolling papers are best for beginners?
Wood pulp papers are forgiving and easy to handle, so they’re a good starting point, although they usually burn faster. Once you’re comfortable, try hemp, rice or mixed-fibre papers.
Can you roll a joint without a filter?
Yes. Leave the mouth end slightly emptier, then pinch, fold or twist it closed after rolling. The downside is that the end can collapse or get soggy, and you may inhale loose bits. Beginners usually get better results with a crutch, which adds structure and improves airflow.
Can I smoke a joint in a bar or in public in Canada?
Not in a bar: bars, restaurants and other enclosed public spaces are smoke-free across Canada. Outdoor public smoking rules depend on your province or territory. Some allow it where tobacco smoking is allowed, while others limit it to private homes, so check local rules first. [VERIFY]
How much weed goes in a joint?
A 1¼ paper holds about 0.3 to 0.5 grams comfortably, which is plenty for a beginner. If you’re new to cannabis, smoke only part of it and wait to feel the effects before having more.